Chapter 10: Real-World Recipes & Troubleshooting
While orthodox dual-panel file managers are renowned for their raw speed and keyboard efficiency, mastering real-world tasks often requires understanding how distinct subsystems—such as directory synchronization, batch pattern renaming, remote virtual filesystems, archive repacking, and recursive search—work together in everyday scenarios. Furthermore, operating within modern macOS introduces security boundaries, sandbox constraints, and system shortcut intersections that every user eventually encounters.
This chapter is divided into two comprehensive sections:
- Practical Real-World Recipes: Five complete, end-to-end walkthroughs covering high-value file management workflows with step-by-step procedures, UI visual representations, keyboard shortcuts, and power-user tips.
- Troubleshooting Guide & FAQs: In-depth explanations and diagnostic resolutions for common operational questions, permission errors, auto-refresh behaviors, configuration resets, Apple keyboard function keys, and cross-volume file transfer mechanics.
1. Visual Quickstart: Everyday Problem-Solving Matrix
The following decision matrix maps common file management objectives and technical challenges directly to ATBCmder's built-in tools and command identifiers:
┌────────────────────────────────────────────────────────────────────────────────────────┐
│                              EVERYDAY TASK & DIAGNOSTIC ROUTER                         │
├────────────────────────────────────────────────────────────────────────────────────────┤
│                                                                                        │
│  TASK / GOAL                               TOOL / METHOD            KEYSTROKE          │
│  ──────────────────────────────────────    ───────────────────────  ─────────────────  │
│  [1] Mirror local projects to backup       Directory Synchronizer   Shift+F12 (⇧F12)   │
│  [2] Reorganize photo libraries by date    Batch Multi-Rename Tool  Ctrl+M (⌃M)        │
│  [3] Mount home/office NAS or server       Network VFS Manager     cm_ManageConnections│
│  [4] Update config file in .zip archive    Archive VFS + Lister    Enter ➔ F4 ➔ Save   │
│  [5] Reclaim disk space from nested clutter Flat Branch View        Cmd+B (⌘B) / Alt+F7│
│                                                                                        │
│  ISSUE / SYMPTOM                           ROOT CAUSE              RESOLUTION          │
│  ──────────────────────────────────────    ──────────────────────  ──────────────────  │
│  "Operation not permitted" error           macOS Sandbox / TCC     cm_GrantAccess      │
│  Panels don't update external drives       FSEvents missing on FAT  attr_poll_interval │
│  Want to experiment without risk           Production XML safety    ATBCmder_test.sh   │
│  F-keys change brightness or volume        macOS hardware F-keys    Fn key or Settings │
│  Move takes long time across drives        Cross-volume Copy+Delete Verify free space  │
│                                                                                        │
└────────────────────────────────────────────────────────────────────────────────────────┘
Dual-Matrix Quick Reference Table
| Action / Diagnostic | macOS Shortcut | Classic Commander Key | Command ID | Primary Purpose |
|---|---|---|---|---|
| Directory Synchronize | Shift+F12 / ⇧F12 |
Shift+F12 |
cm_SyncDirs |
Compares and syncs dual-panel directory trees. |
| Batch Multi-Rename | Ctrl+M / ⌃M |
Ctrl+M |
cm_MultiRename |
Renames multiple files using tokens, counters, and RegEx. |
| Network Connections | Menu: Network | cm_ManageConnections |
cm_ManageConnections |
Manages saved SMB, SFTP, WebDAV, and FTP server profiles. |
| Quick Network Connect | Menu: Network | cm_NetworkConnect |
cm_NetworkConnect |
Ad-hoc connection dialog for remote servers. |
| Archive In-Place Edit | F4 / Fn+F4 |
F4 |
cm_Edit |
Edits archive member; triggers RepackWorker on save. |
| Flat Branch View | Cmd+B / ⌘B |
Ctrl+B |
cm_FlatView |
Recursively displays all nested files in a single flat list. |
| Advanced Search | Alt+F7 / ⌥F7 |
Alt+F7 |
cm_Search |
Multi-filter file search with "Feed to Listbox" output. |
| Grant Filesystem Access | Menu: File / Help | — | cm_GrantFilesystemAccess |
Launches macOS App Sandbox permission assistant. |
| Manual Panel Refresh | Ctrl+R / ⌃R or Cmd+R / ⌘R |
Ctrl+R |
cm_Refresh |
Forces an immediate directory re-read from disk. |
| Launch System Terminal | Ctrl+J / ⌃J |
Ctrl+J |
cm_RunTerm |
Spawns macOS Terminal at current panel path. |
| Calculate Folder Space | Alt+Shift+Enter (Space) |
Alt+Shift+Enter (Space) |
cm_CountDirContent / cm_CalculateSpace |
Computes aggregate recursive byte size (Space for single, Ctrl+L for selected total). |
| Secure Wipe (Shred) | Alt+Delete / ⌥⌫ |
Alt+Delete |
cm_Wipe |
Multi-pass overwrite and permanent file deletion. |
2. Practical Real-World Recipes
2.1 Recipe 1: Comparing and Syncing Two Backup Folders
Objective: Ensure that an external backup drive or network folder contains an exact, up-to-date replica of your active project directory, with complete visibility into added, modified, or deleted files before making changes.
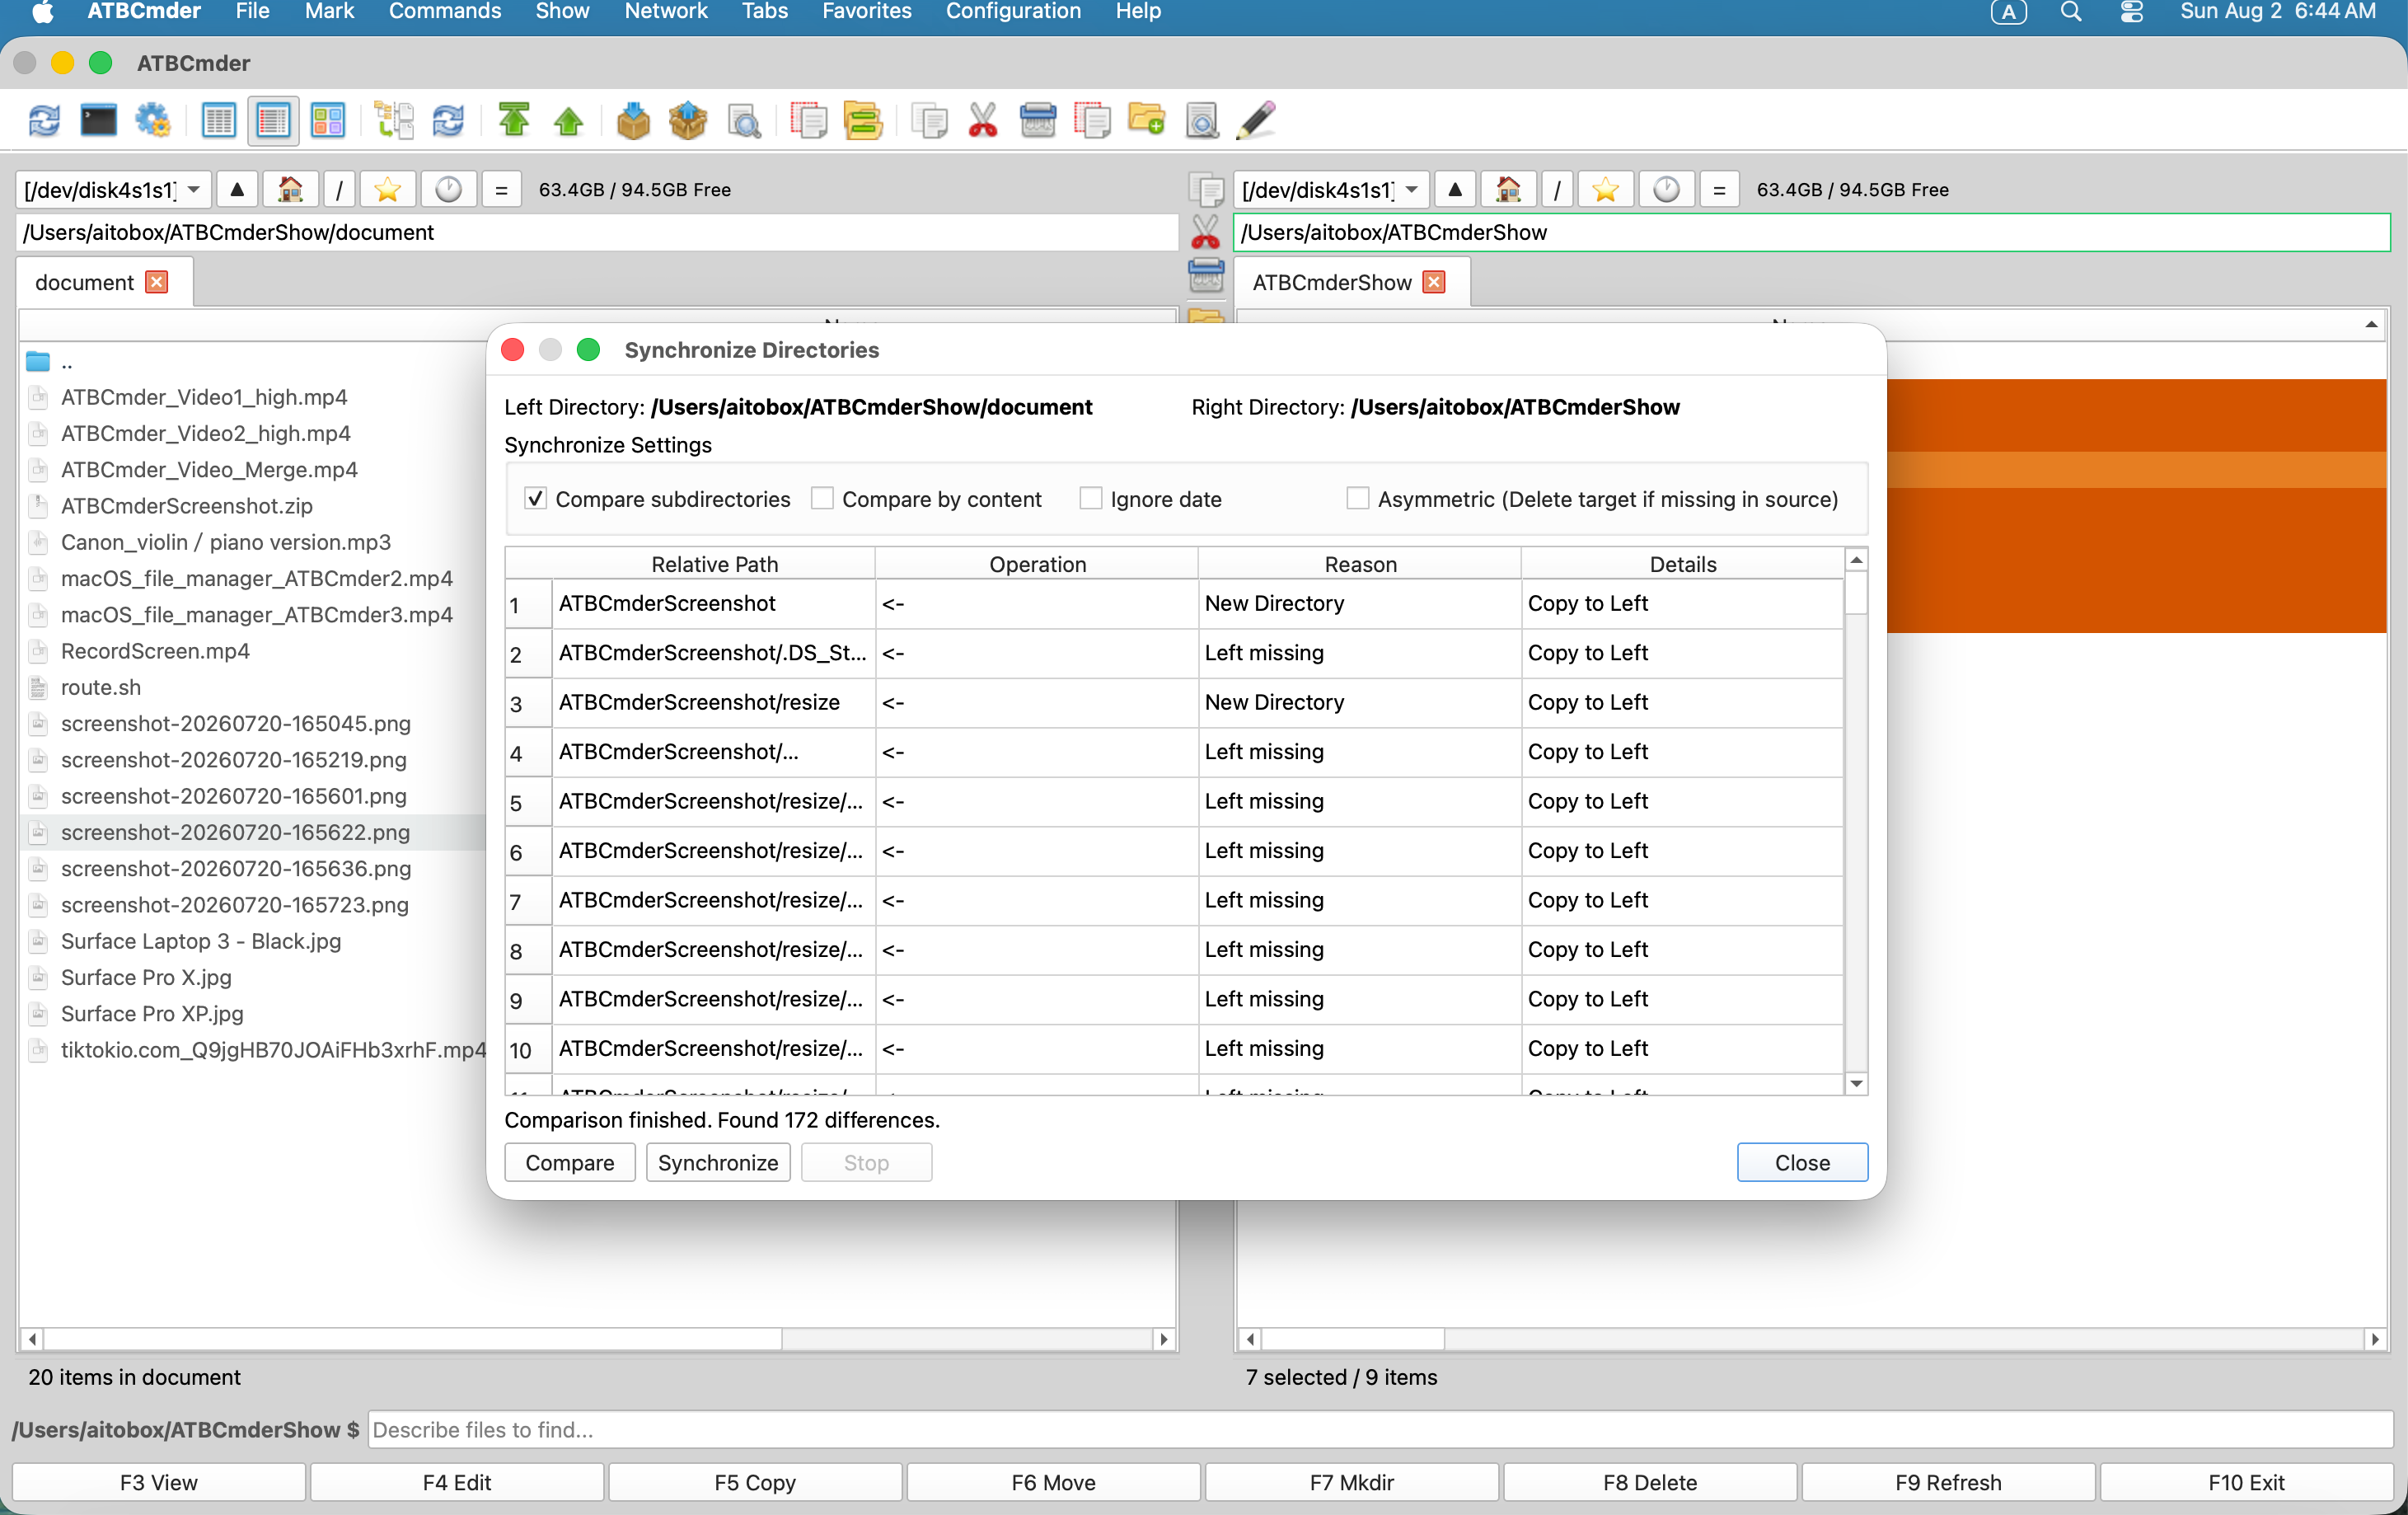
Figure 9.1: The Directory Synchronization dialog displaying side-by-side directory comparisons, directional copy arrows, and asymmetric mirror options.
Step-by-Step Procedure
- Align Source and Target in Dual Panels:
- In the Left Panel, navigate to your primary local working directory (e.g.,
~/Documents/Projects/AppAlpha). - Press
Tabto switch to the Right Panel, and navigate to your target backup destination (e.g.,/Volumes/BackupDrive/Backups/AppAlpha). - Launch Directory Synchronization:
- Press
Shift+F12(⇧F12) or select Commands ➔ Synchronize Dirs... from the menu bar. - The Synchronize Directories dialog opens with the Left Path and Right Path automatically populated.
- Configure Comparison Parameters:
- Check Compare Subdirectories to traverse all nested folders recursively.
- Check Compare by Content if you need cryptographic certainty (verifying file bytes via
filecmp) rather than relying solely on file sizes and modification timestamps. - Ensure FAT / SMB Timestamp Tolerance (2.0 sec) is enabled if your backup destination uses FAT32, exFAT, or an SMB network share, preventing false mismatch flags caused by 2-second filesystem timestamp rounding.
- Initiate the Comparison:
- Click Compare (or press
Alt+C/⌥C). - ATBCmder runs a background comparison worker (
SyncCompareWorker) and populates the comparison table with directional action indicators:->(Left to Right): The local file is newer, or only exists on the left. Action: copy left to right.<-(Right to Left): The backup file is newer, or only exists on the right. Action: copy right to left.=(Equal): Both files are identical in size and timestamp/content. These are hidden from the pending action list by default.!=(Conflict): Incompatible directory-versus-file collision or timestamp mismatch requiring manual inspection.
- Select Your Synchronization Strategy:
- Two-Way Symmetric Sync (Default): Copies newer files in both directions (
->and<-). No files are deleted on either side. Ideal for syncing collaborative folders between machines. - Asymmetric Mirroring (
AsymmetricCheckbox Enabled): Makes the Right directory an exact binary replica of the Left directory. Any file on the Right that does not exist on the Left is permanently deleted from the backup target. - Review and Execute:
- Inspect the summary count at the bottom: e.g., "Left to Right: 42 files (128.4 MB) | Right to Left: 0 files | Deletes: 3 files".
- Click Synchronize to launch the non-blocking background transfer queue. Progress bars reflect active transfer volume and remaining item counts.
Caution
Asymmetric Mirroring Data Loss Hazard: When Asymmetric mode is checked, files present on the target drive that have been deleted or renamed on the source will be permanently removed without moving to the macOS Trash. Always review the directional comparison table before clicking Synchronize!
Tip
⚡ Pro Tip: Content-Level Verification for Media & Code: When backing up video footage or Git repositories, file sizes may match while subtle internal byte corruptions exist. Always check Compare by Content for mission-critical archives. Although byte-by-byte comparison takes longer across USB or Wi-Fi, it guarantees 100% data integrity.
2.2 Recipe 2: Batch Renaming Camera Photos with Dates and Sequence Numbers
Objective: Transform hundreds of unorganized camera files (e.g., DSC_0012.JPG, DSC_0013.JPG, IMG_4901.CR3) into clean, sortable filenames such as 2026-09-06_Vacation_001.jpg with zero-padded sequence counters and live safety previews.
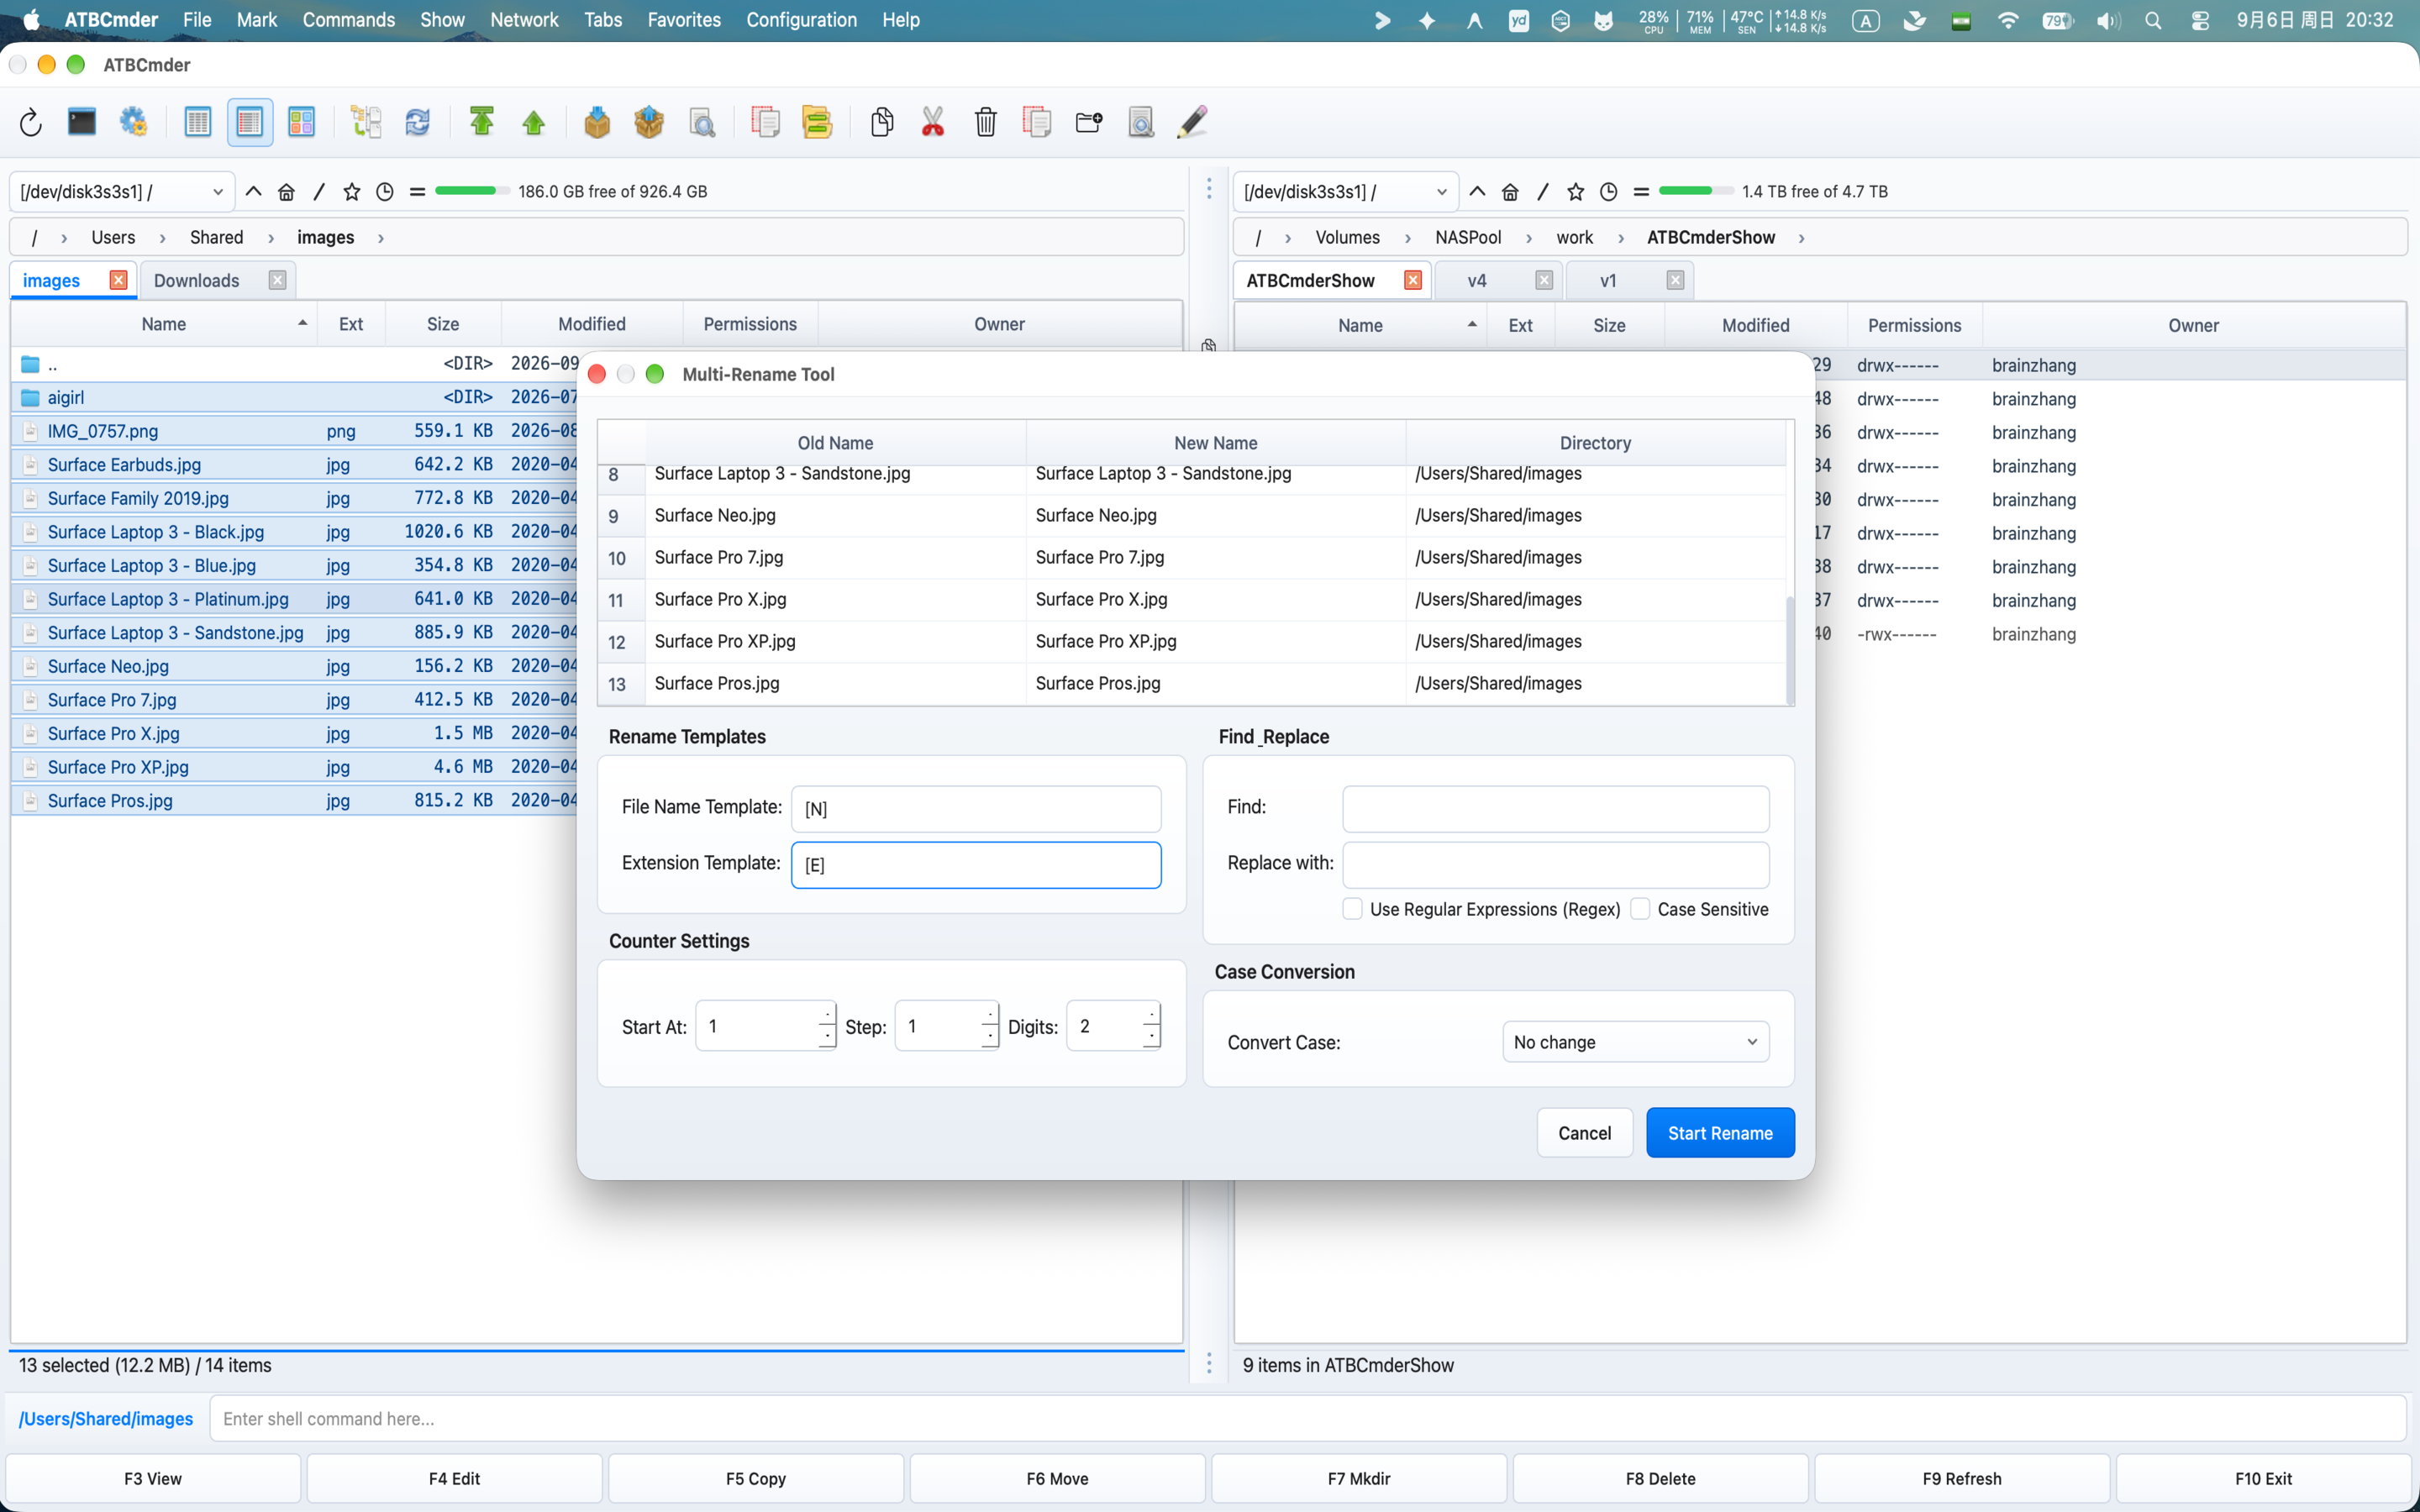
Figure 9.2: The Batch Multi-Rename Tool featuring real-time preview rows, metadata tokens, numeric counter controls, and collision detection.
Step-by-Step Procedure
- Select the Photos:
- Navigate into your camera import directory in the active panel.
- Select all photos using
Cmd+A(⌘A), or press+on your keyboard to enter a wildcard mask like*.jpg;*.jpeg;*.cr3;*.arw. - Launch the Batch Multi-Rename Tool:
- Press
Ctrl+M(⌃M) orCmd+M(⌘M), or choose Files ➔ Multi-Rename Tool... from the menu bar. - Define the Filename Mask:
-
In the File Name Mask field, enter your desired structure using metadata tokens:
-
Token Explanation:
[Y]: 4-digit Year of file modification (e.g.,2026).[M]: 2-digit Month (e.g.,09).[D]: 2-digit Day (e.g.,06).Vacation: Static descriptive text.[C]: Sequential numeric counter.
- Configure the Counter Sequence:
- In the Counter Settings card:
- Start at:
1 - Step:
1 - Digits:
3(this enforces zero-padding:001,002,003... up to999).
- Start at:
- Strip Camera Prefixes with Find & Replace (Optional):
- If you want to preserve part of the original filename without the camera prefix (e.g., keeping the camera sequence number from
DSC_8941.JPG):- Set File Name Mask to:
[YMD]_[N5-] [N5-]extracts characters from index 5 to the end of the name, strippingDSC_entirely.
- Set File Name Mask to:
- Alternatively, use the Search & Replace fields:
- Find:
DSC_ - Replace:
Photo_ - Check RegEx if using complex expression patterns like
^IMG_(\d+).
- Find:
- Inspect the Live Preview Table:
- The 3-column table (
Old Name,New Name,Directory) updates instantaneously with every keystroke. - Check the Status column: ATBCmder highlights duplicate target names in bold red with a collision indicator, preventing accidental overwrites.
- Execute the Rename:
- Press
Enteror click Start Rename. ATBCmder performs the renames atomically on disk and refreshes the panel view.
Note
Extension Safety:
By default, the Extension Mask is set to [E], preserving the original file extension unmodified. Never delete [E] unless you explicitly intend to strip extensions from your files.
Tip
⚡ Pro Tip: External Editor Workflow (⌘I):
If you have an irregular list of client names or track titles, press Cmd+I (⌘I / Edit in External Editor) inside the Multi-Rename tool. ATBCmder exports the target names to your default text editor. Edit the list in Vim, VS Code, or TextEdit, save the document, and ATBCmder immediately imports the revised names into the preview grid.
2.3 Recipe 3: Connecting to a Home/Office NAS over SMB, SFTP, or WebDAV
Objective: Mount an on-premise TrueNAS or Synology storage pool, an AWS EC2 Linux server, or a Nextcloud WebDAV cloud repository into a dual-panel tab without juggling separate terminal commands or Finder connection sheets.
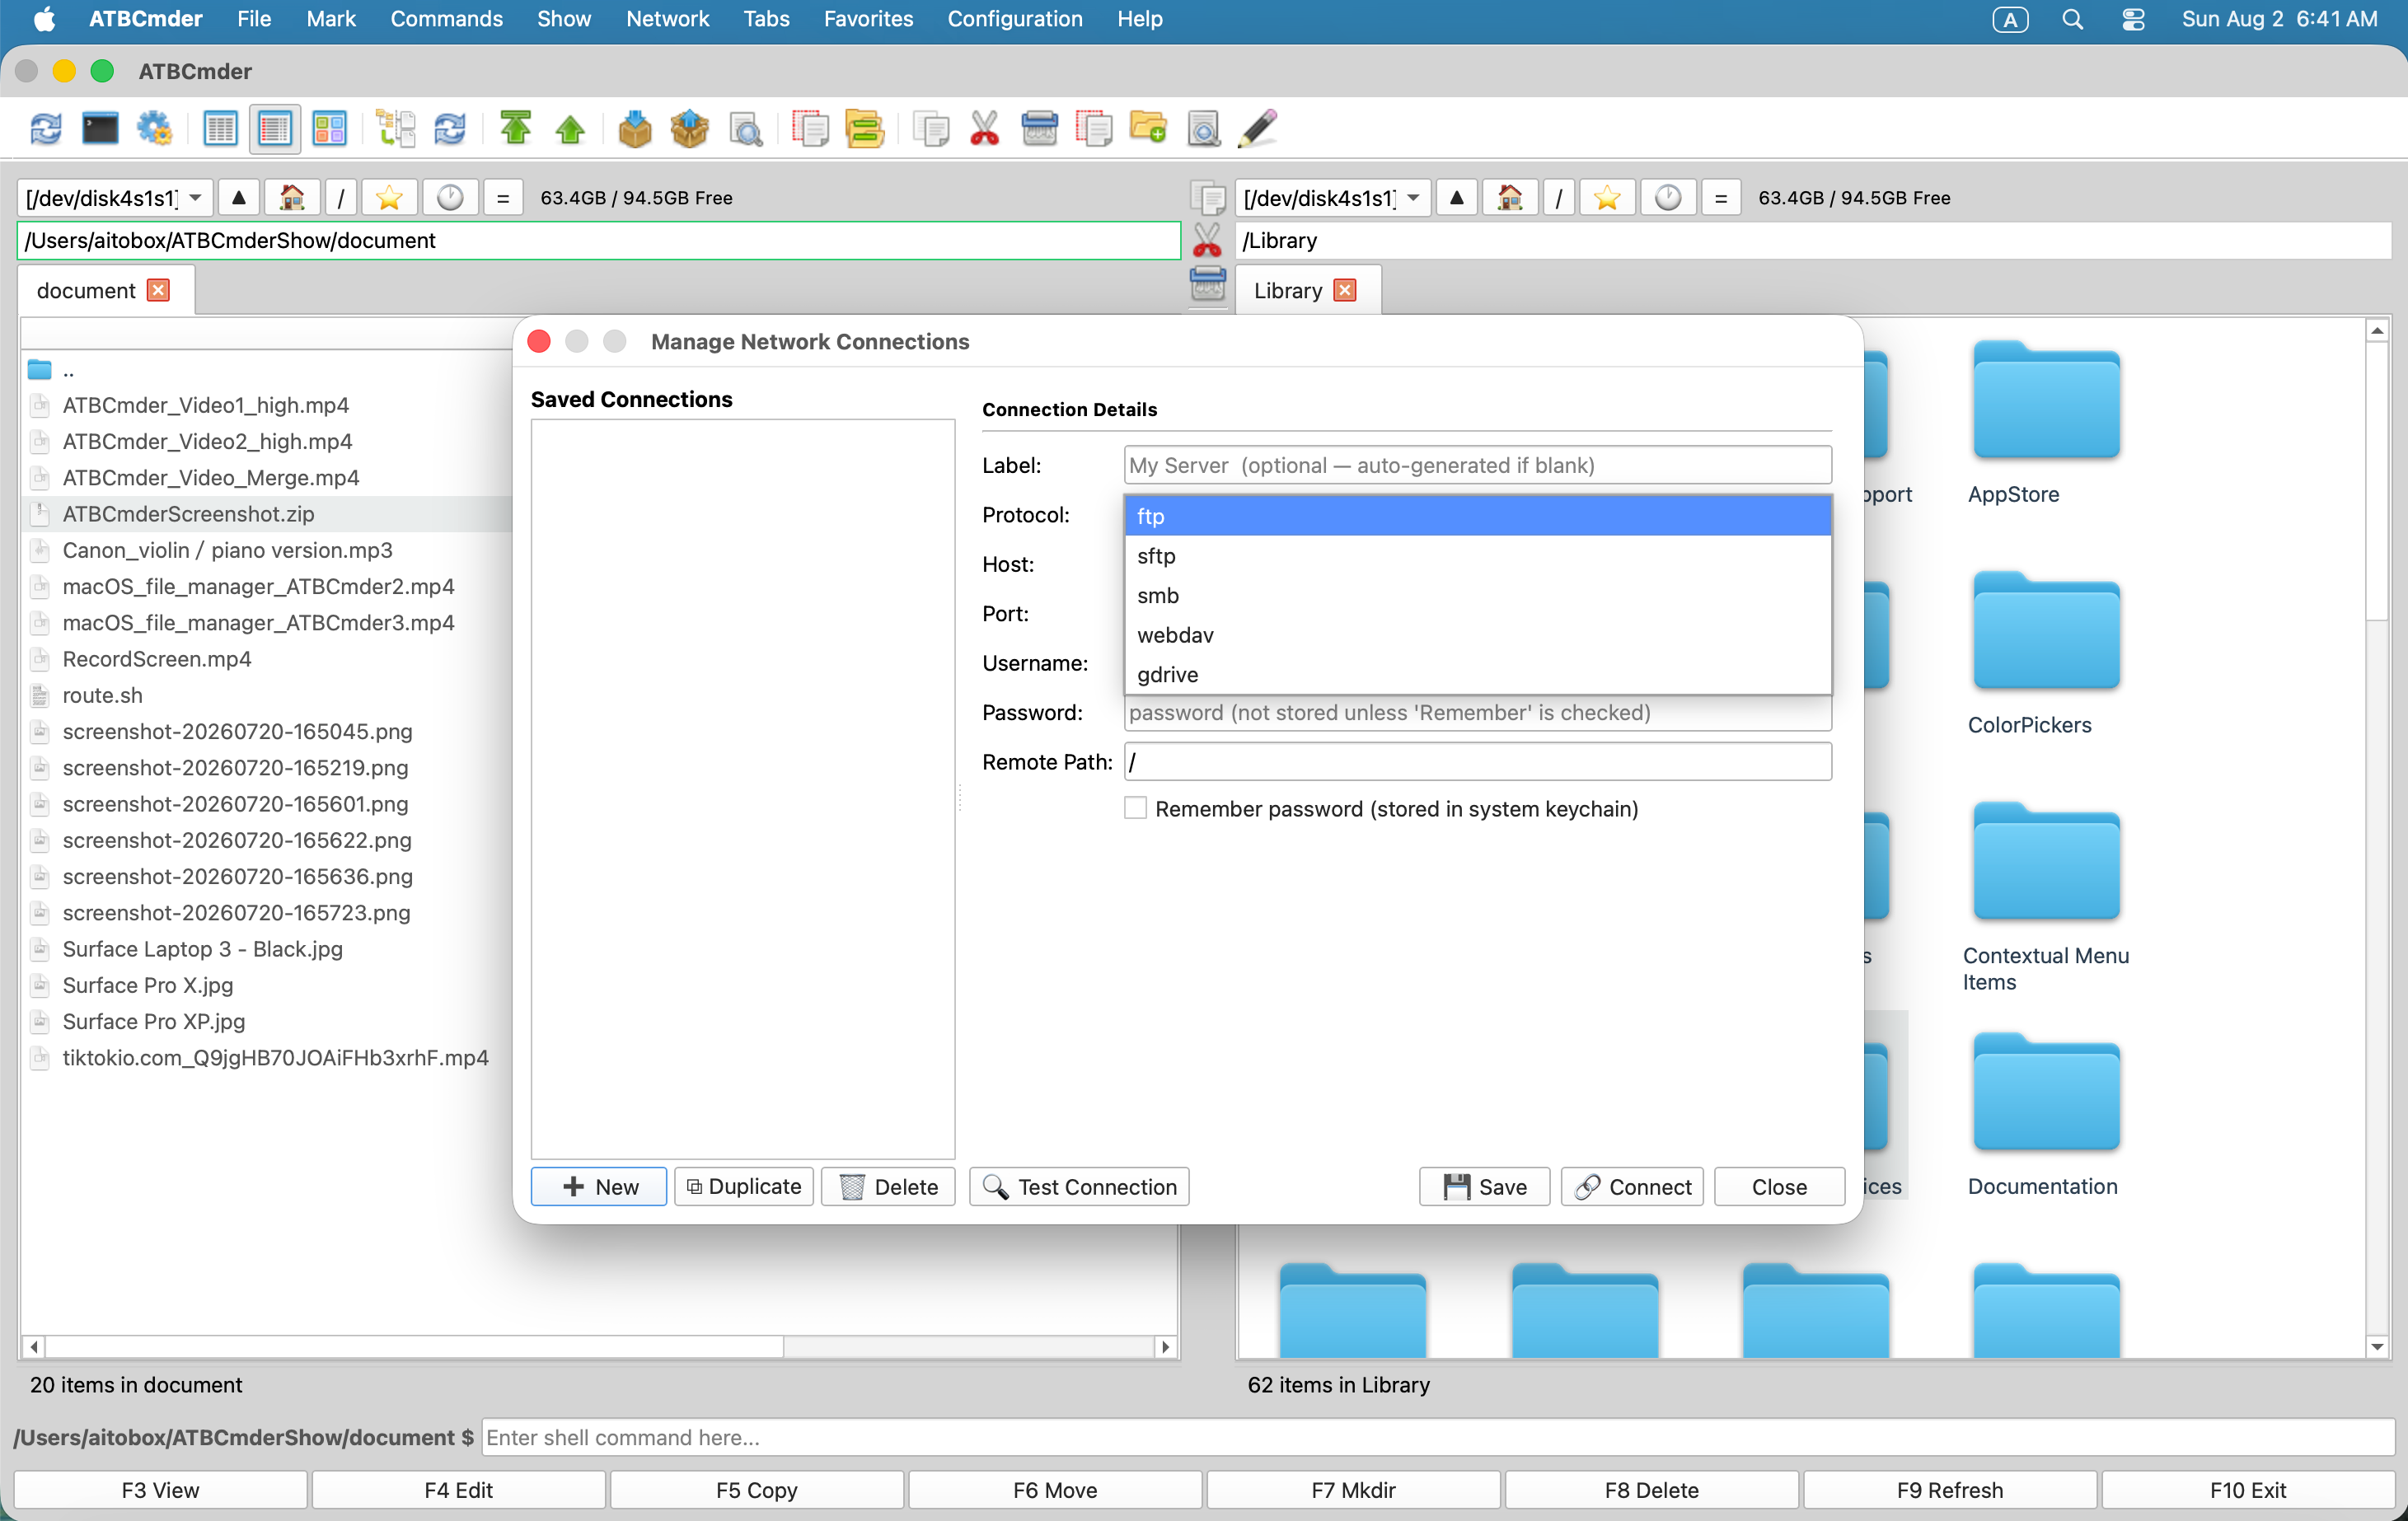
Figure 9.3: Configuring secure remote network shares across SMB, SFTP, and WebDAV protocols.
Step-by-Step Procedure
- Open the Network Connection Manager:
- Choose Network ➔ Manage Network Connections... from the native menu bar, or execute command
cm_ManageConnections. - Create a New Connection Profile:
- Click the
➕ Newbutton on the bottom left. - In the Label field, enter a recognizable identifier (e.g.,
Synology Office NASorAWS Production Web). - Configure Protocol & Host Details:
- Protocol: Select your target protocol from the dropdown:
- SMB/CIFS: Port
445(Standard for Synology, QNAP, Windows Server, TrueNAS). - SFTP (SSH File Transfer): Port
22(Standard for Linux/UNIX cloud instances). - WebDAV / WebDAVS: Port
80or443(Standard for Nextcloud, ownCloud). - FTP / FTPS: Port
21or990(Legacy file hosts).
- SMB/CIFS: Port
- Host: Enter the IP address or domain name (e.g.,
192.168.1.100orsftp.mycompany.com). - Port: Set automatically when protocol is chosen; adjust if your server uses a non-standard port.
- Username: Enter your remote system account username.
- Remote Path: Set the default landing directory (e.g.,
/volume1/Mediaor/var/www/html). - Secure Credential Storage:
- Enter your password or passkey.
- Check Remember password in macOS Keychain.
- Security Guarantee: ATBCmder never stores plaintext credentials in XML configuration files. All secrets are cryptographically sealed inside the native Apple Keychain (
com.aitobox.atbcmder.vfs). - Test the Connection:
- Click
🔍 Test Connection. - ATBCmder dispatches a background worker (
ConnectionTestWorker) that validates network reachability, verifies SSH host keys or TLS certificates, checks credentials, and displays a success alert without closing the dialog. - Connect and Browse:
- Click
🔗 Connect(or pressEnter). -
A new folder tab opens in the active panel, displaying the remote path formatted as a unified VFS URI:
-
You can now browse, search, copy (
F5), move (F6), and delete (F8) files across local disks and remote servers with identical dual-panel agility. - Quick Reconnection from Menu Bar:
- All saved profiles automatically appear under Network ➔ Saved Connections. Simply click any saved server to mount it instantly.
Tip
⚡ Pro Tip: SSH Key-Based Authentication for SFTP:
For automated cloud server access, configure public key authentication. In your SFTP connection profile, leave the password field blank and point to your local private key (e.g., ~/.ssh/id_ed25519). If the key is protected by a passphrase, ATBCmder prompts for it once and saves it securely in your macOS Keychain.
2.4 Recipe 4: Editing a File Directly Inside an Archive Without Extracting
Objective: Modify a nested configuration file (settings.json or config.yaml) inside a multi-gigabyte .zip, .tar.gz, or .7z archive on local storage or a remote server without decompressing the entire archive to your hard drive.
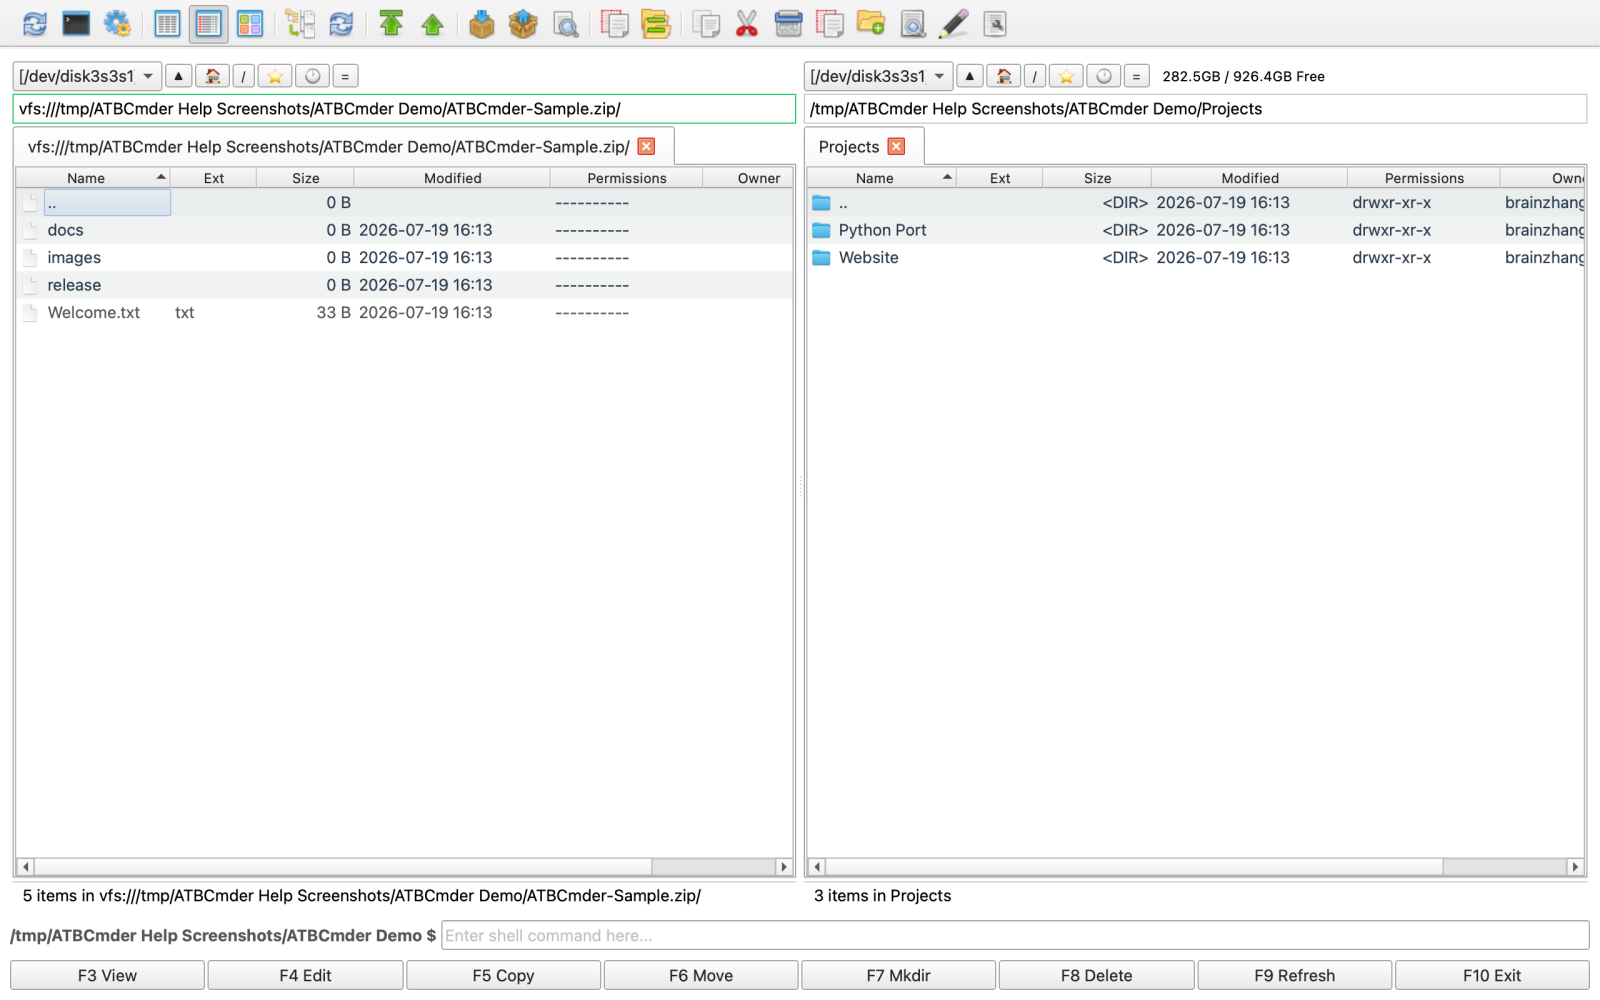
Figure 9.4: Navigating and editing inside compressed archives via the unified vfs:// virtual filesystem.
Step-by-Step Procedure
- Enter the Archive as a Virtual Directory:
- Highlight the archive file (e.g.,
production_backup.zip) in the active panel. - Press
Enter(or double-click). -
ATBCmder intercepts the navigation and mounts the archive as a virtual filesystem:
-
Navigate to the Target File:
- Browse nested virtual directories (
etc,nginx,conf.d) just as you would on a physical volume. - Locate the file you need to update (e.g.,
nginx.conforapp_settings.json). - Open in the Built-in Text Editor:
- Press
F4(Fn+F4/cm_Edit). - ATBCmder streams the compressed member into a temporary isolated buffer and opens it directly in the syntax-highlighted text editor.
- Make Edits and Save:
- Make your required configuration modifications.
- Press
Cmd+S(⌘S) to save the buffer. - Automatic Repack Lifecycle (
RepackWorker): - When you save or close the editor, ATBCmder's background repack engine (
RepackWorker) automatically activates:- It calculates the delta between the original compressed member and your modified buffer.
- It checks the overall archive size against the configured warning threshold (
ArchiveRepackWarningMB). - It recompresses the modified file and rebuilds the archive structure in a temporary file.
- It atomically replaces the original archive file on disk, guaranteeing that no corruption occurs if the system loses power mid-write.
- The active panel view automatically refreshes to display updated member byte sizes and timestamps.
Important
Large Archive Repack Guard (ArchiveRepackWarningMB):
Updating a single 2 KB text file inside a 15 GB archive requires rewriting the entire archive file on disk. To prevent unexpected CPU spikes and SSD wear, ATBCmder checks the archive size. If the archive exceeds ArchiveRepackWarningMB (default: 500 MB), a warning dialog prompts: "This archive is 1.4 GB. Repacking will rewrite the entire file. Do you wish to continue?" You can customize this threshold under Configuration ➔ Options ➔ Archives.
2.5 Recipe 5: Finding and Deleting Large Bloated Files Across Nested Directories
Objective: Reclaim valuable SSD capacity by rapidly locating and safely removing abandoned 4K video renders, bloated node_modules folders, Docker virtual disk images, or outdated DMG installers scattered deep within multi-level directory structures.
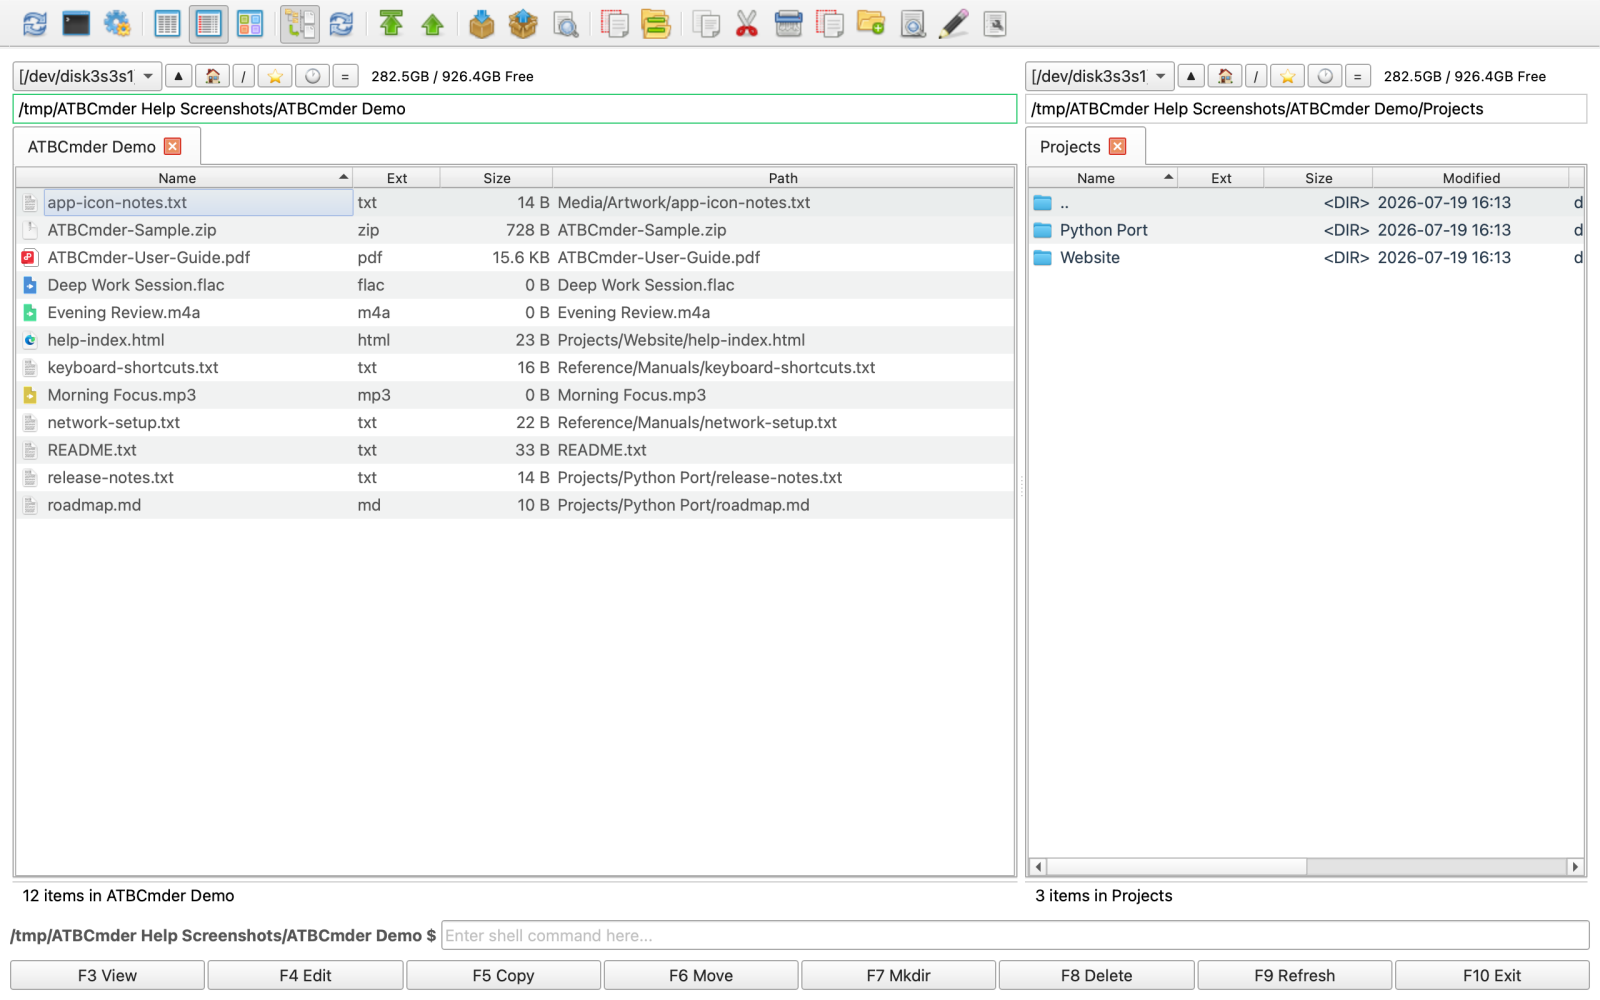
Figure 9.5: Flat Branch View (Cmd+B) displaying deeply nested contents in a single flattened table for instant size sorting.
Method A: Instant Flattening via Flat Branch View (Cmd+B)
- Navigate to the Parent Root Folder:
- Highlight the top-level parent folder you want to audit (e.g.,
~/Projectsor~/Downloads). - Activate Flat Branch View:
- Press
Cmd+B(⌘B) orCtrl+B(cm_FlatView), or select Show ➔ Branch View (Flat View). - ATBCmder recursively scans all subdirectories and displays every nested file in a single, flat list, stripping away directory folder boundaries.
- Sort by Size Descending:
- Click the Size column header, or press
Ctrl+F6(cm_SortBySize) to sort largest files to the top. - Giant ISO files, database dumps, and virtual machine images immediately float to the top of your panel.
- Calculate Directory Space:
- For subfolders visible in standard views, place your cursor on any folder and press
Space(␣/cm_CalculateSpace). ATBCmder calculates the total recursive byte footprint and displays it in place of the default<DIR>label. - Exit Branch View:
- Press
Cmd+Bagain, or pressEsc/Backspaceon..to return to normal hierarchical directory navigation.
Method B: Targeted Filtering via Advanced Search (Alt+F7) & "Feed to Listbox"
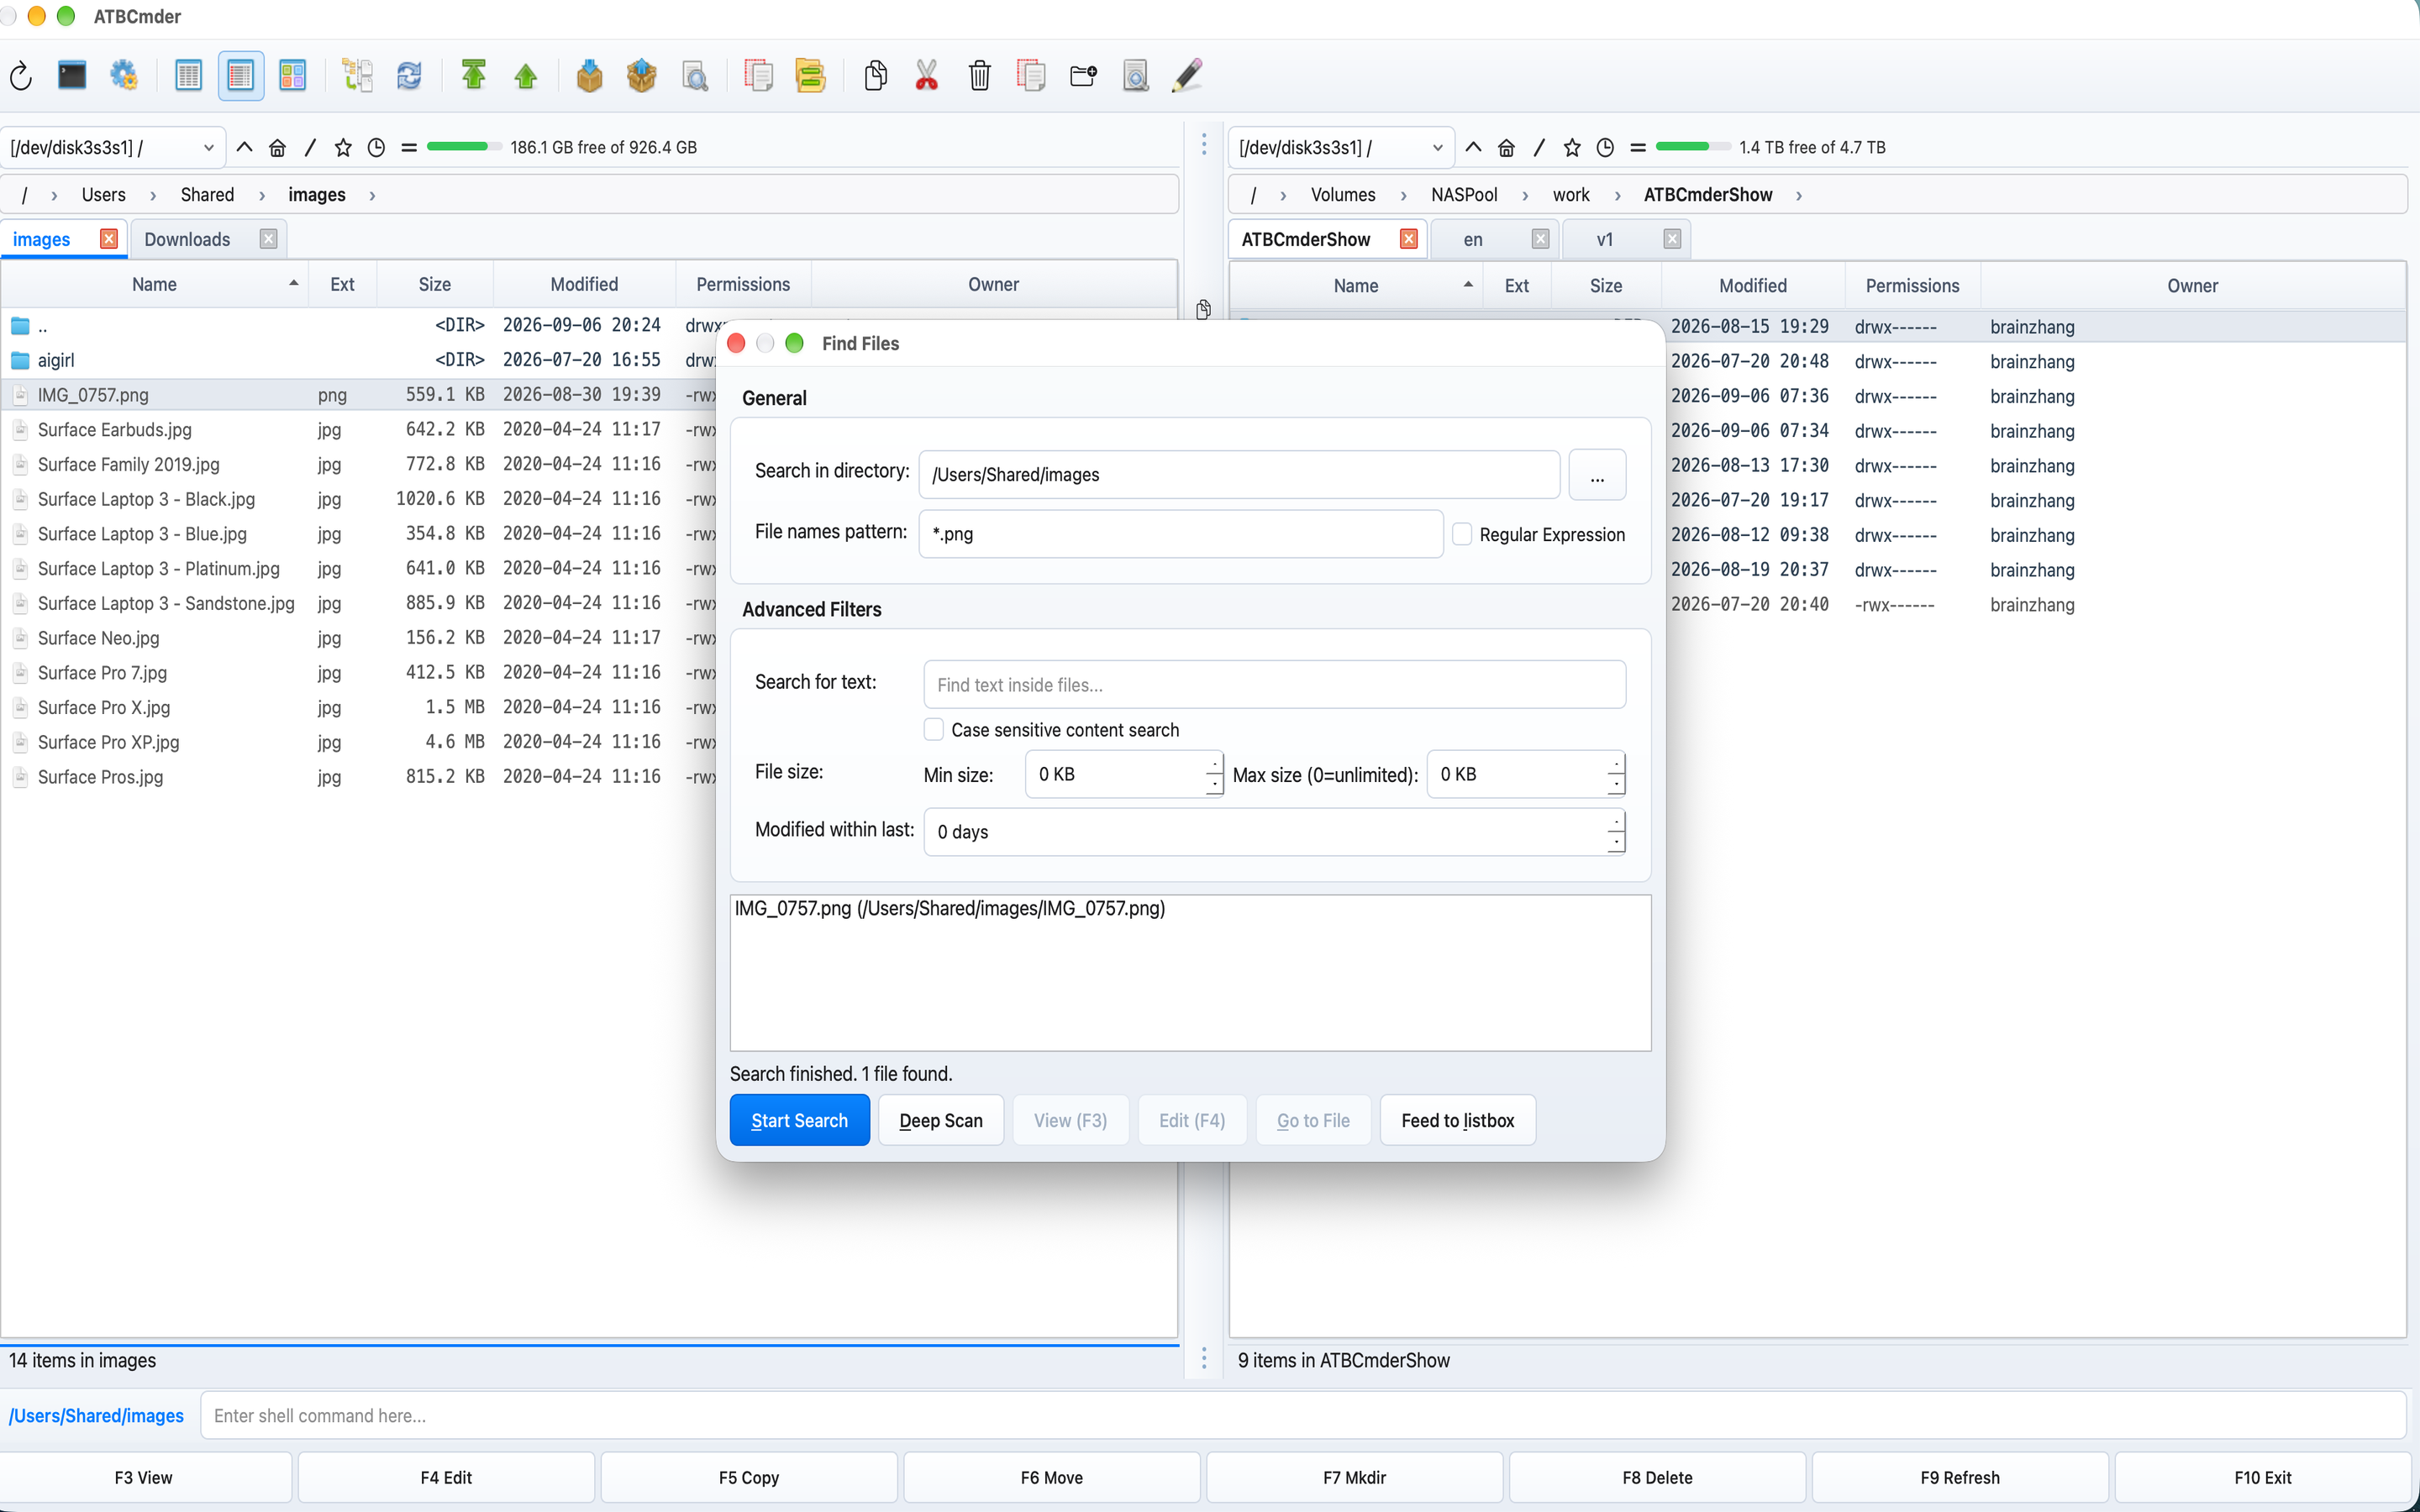
Figure 9.6: Advanced Search dialog with size filter criteria and the "Feed to Listbox" button.
- Launch Advanced Search:
- Press
Alt+F7(⌥F7) or select Commands ➔ Search.... - Define Size & Type Filters:
- In the Search in field, confirm your root directory.
- Check the Size filter: select
>and enter100with unitMB(or1GB). - In the File mask field, specify target extensions (e.g.,
*.dmg;*.iso;*.mp4;*.mov;*.zip) or leave as*to find any bloated item. - In the Date tab, optionally restrict results to files not modified within the last 180 days.
- Execute the Search:
- Click Start Search.
- Feed Results into a Virtual Panel Tab ("Feed to Listbox"):
- Once results populate, click the Feed to listbox button.
- The entire search result set is transferred into a dedicated virtual tab in your active panel.
- Unlike a static modal dialog, files in this tab behave like normal file panel items: you can preview them with Quick View (
Ctrl+Q/⌘Q), inspect them in Universal Lister (F3), or mark multiple files withInsert/Space. - Review and Delete:
- Select unwanted files and press
F8(Fn+F8/cm_Delete) to move them safely to the macOS Trash. - If you need permanent, unrecoverable data erasure (e.g., clearing confidential client data), press
Alt+Delete(⌥⌫/cm_Wipe) to trigger secure multi-pass file shredding.
Tip
⚡ Pro Tip: Identifying Identical Duplicate Files via Checksums:
If you suspect multiple large files are exact duplicates, select them and press Ctrl+X (⌃X / cm_CheckSumCalc). Choose SHA-256 and click Calculate. Matching hash digests confirm 100% binary duplicates, allowing you to delete superfluous copies with complete confidence.
3. Troubleshooting Guide & Frequently Asked Questions (FAQs)
3.1 "Operation Not Permitted" / macOS Permission Denied Errors
Root Cause
Under modern macOS (macOS 12 Monterey through macOS 15 Sequoia), Apple enforces strict App Sandbox and TCC (Transparency, Consent, and Control) privacy boundaries. Sandboxed applications cannot access external drives, system folders, or even standard user directories (~/Documents, ~/Downloads, ~/Desktop) without an explicit user-granted cryptographic permission token known as a Security-Scoped Bookmark.
If ATBCmder has not been granted filesystem access, you may experience:
- File operation dialogs displaying:
"Error: Operation not permitted". - Directories appearing empty even though files exist in Finder.
- External USB or Thunderbolt drives under
/Volumesshowing access denied errors.
Solution 1: Use the App Sandbox Onboarding Assistant (cm_GrantFilesystemAccess)
ATBCmder includes a built-in onboarding assistant designed to register persistent security bookmarks with macOS:
┌─────────────────────────────────────────────────────────────┐
│  Grant Filesystem Access                                [x] │
├─────────────────────────────────────────────────────────────┤
│  Because this version of ATBCmder runs inside a secure      │
│  macOS Sandbox, it needs your permission to access          │
│  critical folders.                                          │
│                                                             │
│  [  Grant Access to Root Directory (/)  ]                   │
│                                                             │
│  [  Grant Access to External Disks (/Volumes)  ]            │
│                                                             │
│  [  Open Full Disk Access Settings…  ]                      │
│                                                             │
│  Root directory access is required by the App Sandbox.      │
│  Full Disk Access is a separate macOS permission for        │
│  protected user data.                                       │
│                                                   [ Done ]  │
└─────────────────────────────────────────────────────────────┘
- From the menu bar, choose File (or Help) ➔ Grant Filesystem Access…, or trigger command
cm_GrantFilesystemAccess. - Click "Grant Access to Root Directory (/)".
- When the native Apple
NSOpenPanelsheet appears pointing toMacintosh HD(/), click Grant Access (or Open). - Why this works: Authorizing
/generates a root Security-Scoped Bookmark stored insandbox_bookmarks.plist. Because child paths inherit security tokens downward, granting access to/permanently unlocks all standard user folders (~/Documents,~/Downloads,/Applications,~/Projects). - Click "Grant Access to External Disks (/Volumes)".
- In the open sheet, click Grant Access for
/Volumes. - This authorizes all connected USB flash drives, external SSDs, SD cards, disk images (DMG), and network SMB mounts.
- Click Done. Your permissions are saved permanently across application restarts.
Solution 2: Grant Full Disk Access (FDA) in macOS System Settings
If you need to manage protected system locations—such as ~/Library/Mail, ~/Library/Messages, Safari browsing caches, or Time Machine backup trees—macOS TCC requires an additional system-level entitlement:
- Open System Settings (Apple menu ➔ System Settings).
- Navigate to Privacy & Security ➔ Full Disk Access.
- Locate ATBCmder in the application list and toggle the switch to On.
- If ATBCmder is not listed:
- Click the
+button at the bottom. - Authenticate with your Mac password or Touch ID.
- Select
/Applications/ATBCmder.appand click Open. - When prompted to restart the application, click Quit & Reopen.
Solution 3: Resetting Corrupted TCC Privacy Permissions via Terminal
If permissions become corrupted after a macOS operating system upgrade or an application re-signing event, reset the TCC database using the macOS tccutil command line tool:
# Reset all Full Disk Access permissions for ATBCmder
tccutil reset SystemPolicyAllFiles com.aitobox.atbcmder

# Reset Desktop, Documents, and Downloads folder permissions
tccutil reset SystemPolicyDocumentsFolder com.aitobox.atbcmder
tccutil reset SystemPolicyDownloadsFolder com.aitobox.atbcmder
tccutil reset SystemPolicyDesktopFolder com.aitobox.atbcmder
After running these commands, restart ATBCmder and re-run cm_GrantFilesystemAccess.
3.2 Auto-Refresh Not Detecting File Changes on Disk
Root Cause
ATBCmder uses a multi-tiered file monitoring engine:
- Kernel
FSEvents: On native Apple APFS and HFS+ volumes, the macOS kernel emits instantaneous directory mutation events when files are added, modified, or deleted by external tools. - Filesystem Limitations: Non-Apple filesystems (e.g., external USB sticks formatted as FAT32 or exFAT) and remote network mounts (SMB, NFS, SFTP, WebDAV) do not support kernel
FSEventsnotifications. When a third-party app creates or deletes a file on an SMB share, the macOS kernel receives zero notification events.
Resolution Steps
- Adjust the Polling Fallback Interval (
attr_poll_interval): - Open Preferences via
Cmd+,(⌘,) or Configuration ➔ Options.... - Navigate to the Auto-refresh page.
- Verify that Watch file name change and Watch attributes change are enabled.
- Adjust the Polling Interval (
attr_poll_interval):- Default:
5 seconds. - For fast local testing or active network development: decrease to
1or2 seconds. - For high-latency Wi-Fi shares: increase to
10or15 secondsto minimize network overhead.
- Default:
- Check the Excluded Directories List:
- On the same Auto-refresh preferences page, review the Excluded Directories table.
- If your active path (or a parent folder) was added to the exclusion list, ATBCmder will deliberately suppress file monitoring to conserve CPU cycles. Remove the path if you wish to re-enable monitoring.
- Verify Background Refresh Settings:
- If file panels only fail to update when ATBCmder is minimized or behind other windows, check the option:
[ ] Disable auto-refresh when ATBCmder is in the background - Uncheck this option if you want ATBCmder to continuously reflect background build outputs and external downloads.
- Force an Immediate Manual Refresh:
- At any time, press
Ctrl+R(⌃R) orCmd+R(⌘R) (cm_Refresh). - This bypasses all caching layers, flushes internal directory models, and immediately re-reads the directory contents from the storage controller.
3.3 Safely Resetting Configuration or Testing in Isolated Test Mode
Testing New Configurations Safely with scripts/ATBCmder_test.sh
When testing experimental keyboard shortcut layouts, new color themes, or automated scripting commands, you should avoid modifying your production configuration XML.
ATBCmder provides a sandboxed test launcher script:
How It Works:
- The script creates a dedicated temporary directory:
tests/.test_config/. - It copies the clean baseline test configuration (
src/atbcmder/resources/test_config.xml) totests/.test_config/atbcmder.xml. -
It exports the environment variable:
-
When launched, ATBCmder reads all settings exclusively from this test folder. Any changes, tab modifications, or hotkey experiments are contained entirely within
tests/.test_config/, leaving your personal preferences completely untouched.
Restoring Factory Default Configuration
If your production configuration becomes corrupted or you want to start completely fresh:
- Quit ATBCmder completely (
Cmd+Q/⌘Q). - Open macOS Terminal and locate your configuration directory:
- Standard installation:
~/Library/Preferences/atbcmder/ - Linux / XDG fallback:
~/.config/atbcmder/ -
Back up or remove the active configuration files:
-
Restart ATBCmder.
- On startup, ATBCmder detects the missing configuration files and automatically regenerates clean, validated XML configurations populated with official factory defaults.
Exporting & Importing Portable Configurations
To migrate your configuration across multiple Macs or create an external backup:
- Export: Choose Configuration ➔ Export Configuration... (command
cm_ExportConfiguration) to save a consolidated.zipor.xmlsnapshot containing your hotkeys, columns, favorite tabs, and color palettes. - Import: Choose Configuration ➔ Import Configuration... (command
cm_ImportConfiguration) on your target machine to restore settings instantly.
3.4 Function Keys Triggering macOS Brightness/Volume Instead of Commands
Root Cause
By default, Apple keyboards (MacBook built-in keyboards, Magic Keyboards) assign special hardware functions to the top row of keys:
F1/F2: Display brightness down / upF3: Mission ControlF4: Spotlight / LaunchpadF7/F8/F9: Media playback controls (rewind, play/pause, fast-forward)F10/F11/F12: Audio mute, volume down, volume up
When you press F5 hoping to copy a file, macOS intercepts the keystroke and does nothing (or adjusts keyboard illumination).
Solution 1: Use the Fn Modifier Chord
Hold down the Fn (Function) or Globe (🌐) key in the bottom-left corner of your keyboard while pressing the function key:
Fn+F3: Universal Lister (cm_View)Fn+F4: Text Editor (cm_Edit)Fn+F5: Copy Files (cm_Copy)Fn+F6: Move / Rename Files (cm_Rename)Fn+F7: Create New Folder (cm_MakeDir)Fn+F8: Delete to Trash (cm_Delete)Fn+Shift+F12: Synchronize Directories (cm_SyncDirs)
Solution 2: Enable Standard Function Keys System-Wide in macOS Settings
If you use ATBCmder regularly, configuring macOS to treat function keys as standard F1-F12 keys is the recommended setup:
- Open System Settings (Apple menu ➔ System Settings).
- Select Keyboard in the left sidebar.
- Click the Keyboard Shortcuts... button.
- Select Function Keys in the left list of the modal sheet.
- Turn on the toggle switch: "Use F1, F2, etc. keys as standard function keys"
- Click Done.
┌─────────────────────────────────────────────────────────────┐
│  Keyboard Shortcuts                                         │
├──────────────────────────────┬──────────────────────────────┤
│  Keyboard Navigation         │  Use F1, F2, etc. keys as    │
│  Modifier Keys               │  standard function keys  [ON]│
│  Function Keys          ◄─── │                              │
│  Spotlight                   │  When this option is on,     │
│  Mission Control             │  press the Fn key to use the │
│  App Shortcuts               │  special features printed    │
│                              │  on each key.                │
│                              │                     [ Done ] │
└──────────────────────────────┴──────────────────────────────┘
Result: Pressing F5 now directly triggers Copy in ATBCmder. To adjust brightness or volume, hold Fn while pressing the key.
Solution 3: Use Native macOS Cmd Key Equivalents
If you prefer not to change system keyboard settings, ATBCmder provides native macOS keyboard shortcuts for every core operation:
- Copy:
Cmd+C/Cmd+V(or standardF5) - Move:
Cmd+C➔Cmd+Option+V(⌥⌘Vmove paste) - Delete:
Cmd+Delete(⌘⌫) - New Folder:
Shift+Cmd+N(⇧⌘N) - Rename:
F2orReturn - Batch Multi-Rename:
Ctrl+M(⌃M) orCmd+M(⌘M) - Preferences:
Cmd+,(⌘,) - Close Tab:
Cmd+W(⌘W)
3.5 Moving Files Across Different Drives vs. Same Drive
A frequent question from users is why moving a 20 GB file within the same folder takes a fraction of a second, while moving the same file to an external drive or network share takes several minutes.
Intra-Volume Move (Same Drive / APFS Partition)
┌────────────────────────────────────────────────────────────────────────────────────────┐
│                              INTRA-VOLUME MOVE (SAME PARTITION)                        │
├────────────────────────────────────────────────────────────────────────────────────────┤
│                                                                                        │
│   Source: /Users/brain/Downloads/BigFile.iso   ➔ Target: /Users/brain/Movies/          │
│                                                                                        │
│   1. POSIX rename() system call updates filesystem inode directory table.              │
│   2. Physical data blocks on the SSD are NEVER touched or copied.                      │
│   3. Execution time: < 5 milliseconds. Free disk space required: 0 bytes.              │
│                                                                                        │
└────────────────────────────────────────────────────────────────────────────────────────┘
When source and destination paths reside on the same physical filesystem volume, ATBCmder issues an atomic POSIX rename() system call. The operating system simply updates pointer entries in the filesystem's directory catalog. The physical data clusters on your SSD do not move.
Cross-Volume Move (Different Drives / Partitions / Network Mounts)
┌────────────────────────────────────────────────────────────────────────────────────────┐
│                              CROSS-VOLUME MOVE (ACROSS DRIVES)                         │
├────────────────────────────────────────────────────────────────────────────────────────┤
│                                                                                        │
│   Source: /Users/brain/Downloads/BigFile.iso   ➔ Target: /Volumes/ExternalSSD/Movie/   │
│                                                                                        │
│   Stage 1: Binary Stream Copy (Read from Source SSD ➔ Write to Target External SSD)    │
│   Stage 2: Verification and Flush (fsync ensures complete write to external media)     │
│   Stage 3: Source Deletion (Source file is unlinked only after Stage 2 succeeds)       │
│                                                                                        │
└────────────────────────────────────────────────────────────────────────────────────────┘
When transferring across different filesystem boundaries (e.g., from your internal Mac SSD to an external USB drive, network SMB share, or disk image), an atomic pointer update is physically impossible. ATBCmder executes a multi-stage Copy-Verify-Delete pipeline:
- Binary Stream Read/Write: Data is streamed in chunks from the source storage controller through system memory and written to the target storage controller. Transfer duration depends entirely on the physical bus speed (e.g., USB 3.0 at ~100 MB/s vs. Thunderbolt 4 at ~2,800 MB/s).
- Buffer Flush & Verification: ATBCmder calls
fsync()on the destination file handle to ensure that all cached data has been written to physical media and checks byte count equivalence. - Safe Source Deletion: Only after the destination file has been completely written and verified does ATBCmder delete the source file from the original disk.
Critical Implications & Safety Guarantees
- Free Space Requirement: The target drive must have sufficient free capacity to store the complete file payload before the operation begins. If you attempt to move a 30 GB file to an external drive with only 10 GB free, the transfer will fail.
- Zero Data Loss Guarantee: If an external drive is accidentally unplugged, or if target storage runs out of space mid-transfer, ATBCmder immediately aborts the operation, leaves the source file completely intact and unharmed, removes any partial target file, and reports a clear error dialog.
- Background Queue Monitoring (
cm_OperationsPanel): Long-running cross-volume moves run on asynchronous background worker threads (FileOpWorker). You can monitor real-time transfer speeds, remaining times, pause/resume transfers, or queue subsequent operations without locking the user interface.
3.6 Additional Frequently Asked Questions
Q1: How do I switch focus between the Left and Right panels?
Press the Tab (⇥) key. Focus toggles instantly between the active and inactive file tables. The active panel displays an accented border highlight and focused status bar text.
Q2: How do I swap the contents of the Left and Right panels?
Press Ctrl+U (⌃U) or execute command cm_Exchange. The directories, folder tabs, and cursor positions of the left and right panels swap instantly. To equalize panel widths to an exact 50/50 split, double-click anywhere on the vertical middle splitter bar.
Q3: How do I select files using wildcard patterns?
Press the + key on your keyboard (or choose Mark ➔ Select Group... / cm_MarkPlus). Enter a wildcard pattern such as *.pdf or photo_2026_*.jpg. To deselect files matching a pattern, press the - key (cm_MarkMinus). To invert your current selection, press * (cm_MarkInvert).
Q4: How do I toggle the visibility of hidden dotfiles?
Press Cmd+H (⌘H) or Cmd+Shift+Period (⇧⌘.), or execute command cm_ShowSysFiles. Hidden Unix files (files starting with a dot, such as .zshrc, .gitignore, .env) toggle between visible and hidden states immediately.
Q5: How do I open a macOS Terminal window at the current directory?
Press Ctrl+J (⌃J) or execute command cm_RunTerm. ATBCmder spawns a new macOS Terminal (or iTerm2) session with its current working directory set to the exact path of your active file panel.
Q6: Does ATBCmder support Intel (x86_64) Macs?
Yes! Starting with version 1.8.0, ATBCmder provides dual-architecture universal packages natively supporting both Apple Silicon (M1/M2/M3/M4, ARM64) and Intel (x86_64) Mac computers running macOS 12.0 or later.
4. Pro Tips & System Maintenance Checklist
To keep ATBCmder performing at peak velocity across enterprise workflows:
- Weekly Cache Maintenance: If you frequently browse high-resolution camera cards, clear temporary thumbnail caches periodically via Configuration ➔ Options ➔ Thumbnails ➔ Clear Thumbnail Cache to reclaim disk space.
- Keychain Audit: If you rotate passwords on remote SFTP or SMB servers, update your credentials in ATBCmder via Network ➔ Manage Network Connections.... Editing and saving updates the corresponding credential item in your macOS Keychain seamlessly.
- Background Queue Optimization: For multi-gigabyte transfers over 1 Gbps or 10 Gbps networks, adjust chunk buffer sizes in Configuration ➔ Options ➔ File Operations to maximize bus saturation.
- Preserve UNIX Permissions: When copying scripts or compiled binaries between macOS APFS drives, ensure Preserve file attributes and permissions is checked in the Copy dialog (
F5), maintaining execute (chmod +x) flags automatically.
ATBCmder User Guide & Documentation Portal
← Return to Documentation Portal • Chapter 1: Fundamentals • Chapter 9: Shortcuts • Chapter 11: Download & Installation →