Chapter 6: Virtual File Systems & Network
Modern file management rarely stops at the boundary of a single physical hard drive. Software developers maintain remote staging environments over SFTP; system administrators manage enterprise file shares over SMB/CIFS; content creators access cloud storage and media servers over WebDAV; and power users routinely inspect, edit, and package gigabyte-scale compressed archives.
Traditional desktop environments force users to juggle disjointed applications: a standalone archive utility to unpack and re-compress zip archives, an external FTP/SFTP client to manage server assets, and operating system mount dialogs that scatter remote volumes across disconnected Finder windows.
ATBCmder eliminates this fragmentation through its Virtual File System (VFS) engine. Built upon a unified vfs:// URI abstraction layer, ATBCmder treats remote servers and compressed archives exactly like standard local folders. You can navigate into a .tar.gz archive, preview code files with F3, edit a nested configuration file with F4 (with automatic live repacking upon save), and copy assets directly across a secure SFTP session to an on-premise SMB NAS using the standard F5 key—all without extracting intermediate files to disk or switching between separate tools.
1. Visual Quickstart: The VFS Architecture & Command Matrix
ATBCmder routes all filesystem access through a unified abstraction layer. Whether a path points to an Apple APFS SSD partition, a member inside a nested .zip archive, or a remote directory hosted on a Linux SFTP server halfway around the world, the dual-panel interface provides an identical operational model.
┌────────────────────────────────────────────────────────────────────────────────────────┐
│                              ATBCMDER DUAL-PANEL GUI                                   │
│            Left Panel (Active)                  Right Panel (Inactive / Target)        │
├────────────────────────────────────────────────────────────────────────────────────────┤
│                                          │                                             │
│  [1] Local File System                   │  [2] Archive Virtual File System (VFS)      │
│      file:///Users/brain/projects/       │      vfs:///Users/brain/backup.tar.gz/src/  │
│      Direct POSIX / APFS access          │      In-place browse, F3 view, F4 live edit │
│                                          │                                             │
│  [3] Remote Network VFS (SFTP/SSH)       │  [4] Remote Storage VFS (SMB / WebDAV)      │
│      vfs://sftp://deploy@aws.prod/app/   │      vfs://smb://admin@truenas/Pool/Media/  │
│      Paramiko / SSH Keys / Keychain      │      Kernel mount_smbfs / WebDAVClient3     │
│                                          │                                             │
├────────────────────────────────────────────────────────────────────────────────────────┤
│                          UNIFIED VFS DISPATCH ENGINE (vfs://)                          │
│     FileSystemModel ➔ VFSManager ➔ SessionCache ➔ StreamCopyWorker / RepackWorker      │
└────────────────────────────────────────────────────────────────────────────────────────┘
Dual-Matrix VFS & Network Cheat Sheet
| Action | macOS Shortcut | Classic Commander Key | Command ID | Description |
|---|---|---|---|---|
| Pack Files into Archive | Alt+F5 / ⌥F5 |
Alt+F5 |
cm_PackFiles |
Opens Archive Pack dialog with format, compression, and password options. |
| Extract Files from Archive | Alt+F9 / ⌥F9 |
Alt+F9 |
cm_ExtractFiles |
Unpacks selected archive(s) with collision resolution. |
| Quick Network Connect | Menu: Network | cm_NetworkConnect |
cm_NetworkConnect |
Opens the fast ad-hoc connection dialog. |
| Connection Manager | Menu: Network | cm_ManageConnections |
cm_ManageConnections |
Opens full CRUD network manager with saved connection profiles. |
| FTP Connect | Ctrl+S / ⌃S |
Ctrl+S |
cm_FTPConnect |
Quick shortcut to trigger FTP connection session. |
| Enter Archive / Folder | Enter / ⏎ |
Enter |
cm_Open |
Navigates directly inside a .zip, .tar, .7z, or remote directory. |
| Ascend to Parent Folder | Backspace / ⌫ |
Backspace |
cm_GoToParent |
Climbs out of archive or remote directory back to parent level. |
| View Virtual / Remote File | F3 / Fn+F3 |
F3 |
cm_View |
Streams remote or archive file into Universal Lister. |
| Edit Virtual / Remote File | F4 / Fn+F4 |
F4 |
cm_Edit |
Opens file in editor; auto-repacks or uploads back upon saving. |
| Copy Across Panels / VFS | F5 / Fn+F5 |
F5 |
cm_Copy |
Copies selected items across local, archive, or network endpoints. |
| Background Operations Panel | Menu: Show | cm_OperationsPanel |
cm_OperationsPanel |
Monitors background transfer queues, speeds, and active threads. |
2. The Unified vfs:// URI Abstraction
Traditional file managers treat remote servers and archives as second-class citizens, requiring external mounting utilities, temporary extraction folders, or third-party transfer clients. ATBCmder unifies every file source under a single, well-defined URI specification:
2.1 Anatomy of Virtual Paths
Depending on the operational domain, vfs:// URIs take one of two standard forms:
-
Archive Virtual Paths:
-
Outer Prefix:
vfs://instructsFileSystemModelto intercept path traversal. - Container Path:
/Users/brain/Documents/release_v1.7.zipidentifies the physical container archive on local storage. -
Internal Member:
src/main.pypinpoints the virtual resource nested inside the archive. -
Network Server Paths:
-
Scheme Specifier: Identifies the transport driver (
sftp,ftp,ftps,smb,webdav,webdavs,gdrive,dropbox). - Authentication: Encodes user credentials and target port.
- Remote Target: Resolves absolute directory and file paths on the remote host.
┌────────────────────────────────────────────────────────────────────────────────────────┐
│                              VFS URI ROUTING IN ACTION                                 │
├────────────────────────────────────────────────────────────────────────────────────────┤
│                                                                                        │
│   Input URI: vfs://sftp://deploy@aws.infra:22/var/log/nginx/access.log                 │
│                 │      │        │        │   └────────────────────► Remote Path        │
│                 │      │        │        └────────────────────────► Port (Default 22)  │
│                 │      │        └─────────────────────────────────► Host / Server      │
│                 │      └──────────────────────────────────────────► Username           │
│                 └─────────────────────────────────────────────────► Protocol Scheme    │
│                                                                                        │
│   Input URI: vfs:///Volumes/Data/Archive.zip/docs/manual.pdf                           │
│                 │                      │        └─────────────────► Archive Member     │
│                 │                      └──────────────────────────► Physical Archive   │
│                 └─────────────────────────────────────────────────► Virtual Scheme     │
└────────────────────────────────────────────────────────────────────────────────────────┘
2.2 Seamless Dual-Panel Integration
Because virtual paths conform to standard directory structures inside ATBCmder, you enjoy full dual-panel parity:
- Tabbed Virtual Workspaces: Open a remote SFTP folder in Tab 1, an encrypted local ZIP archive in Tab 2, and your local
~/Downloadsfolder in Tab 3. - Directional Copying (
F5): Select files in your local active panel and pressF5to upload them directly into the remote server or compressed archive displayed in the inactive panel. - Drag-and-Drop Interoperability: Drag items across panels between local disks, network shares, and archive hierarchies without intermediate staging.
- Interactive Breadcrumb Bar: The breadcrumb path bar parses virtual URIs into clickable segments. Click any parent folder or the root server badge to jump up the tree instantly.
3. Archive VFS: In-Place Navigation & Inspection
Opening an archive in ATBCmder requires no manual extraction or third-party decompression tool. Simply highlight any supported archive and press Enter (or double-click). ATBCmder mounts the archive in-place, transforming the panel into a high-speed virtual directory browser.
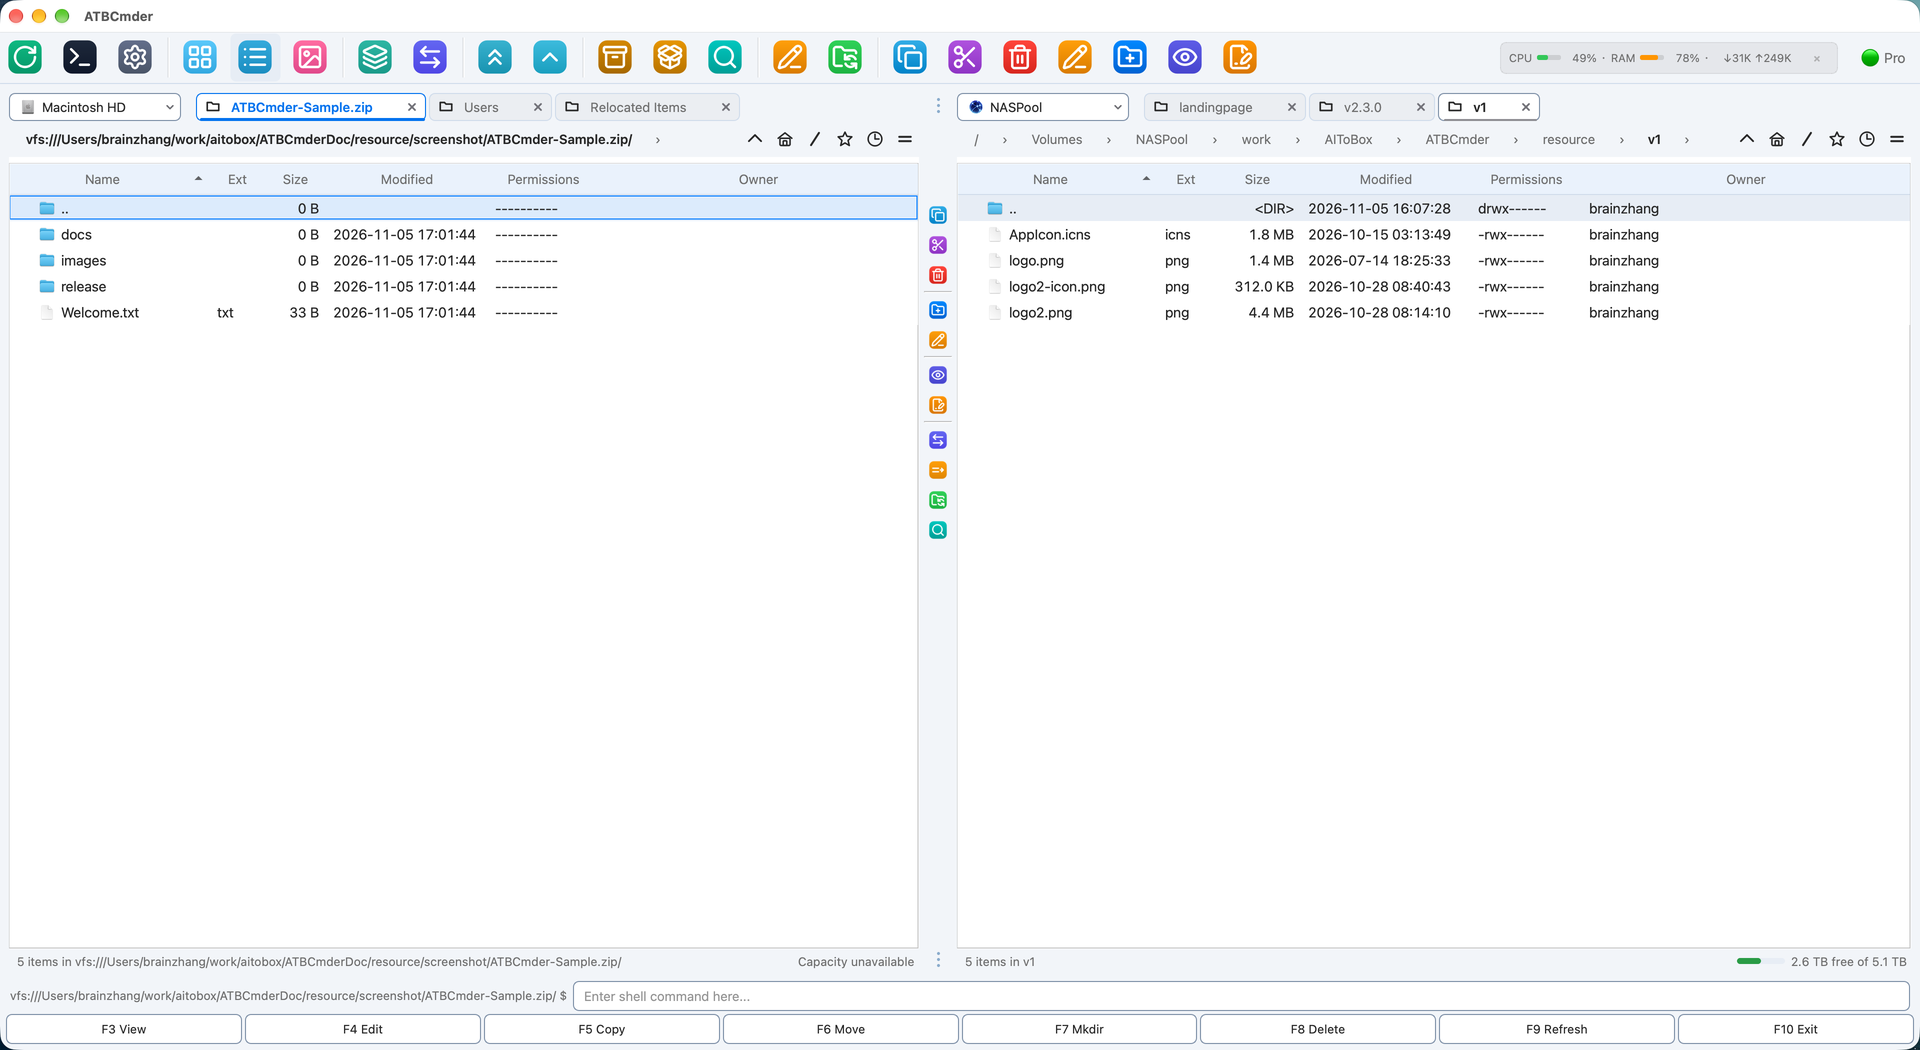
Figure 6.1: Navigating inside a multi-nested compressed archive as a virtual folder, showing uncompressed sizes, timestamps, and subdirectories.
3.1 Supported Archive Formats
ATBCmder features built-in drivers for all industry-standard archive and compression formats:
| Format | File Extensions | Read Support | Write / Pack | Encryption Support |
|---|---|---|---|---|
| ZIP | .zip |
Yes | Yes | Standard & AES-256 (pyzipper) |
| GZip Tarball | .tar.gz, .tgz |
Yes | Yes | POSIX standard tar streaming |
| BZip2 Tarball | .tar.bz2, .tbz2 |
Yes | Yes | High-ratio bzip2 block compression |
| XZ Tarball | .tar.xz, .txz |
Yes | Yes | High-efficiency LZMA2 compression |
| Plain TAR | .tar |
Yes | Yes | Uncompressed UNIX tape archive |
| 7-Zip | .7z |
Yes | Yes (via py7zr) |
LZMA / LZMA2 solid compression |
3.2 In-Place Navigation Workflows
When browsing inside an archive:
- Enter Subdirectories: Press
Enteron any folder inside the archive to explore nested trees. - Ascend to Parent (
..): PressBackspace(⌫) or double-click the.. [Parent Directory]entry to ascend. Once you reach the root of the archive, pressingBackspacereturns you cleanly to the physical directory containing the archive file. - Instant Preview (
F3/Fn+F3): Highlight any document, image, or source file inside the archive and pressF3. ATBCmder automatically extracts the target file to a secure temporary sandbox and renders it inside the Universal Lister. - Selective Copying (
F5/Fn+F5): Instead of unpacking an entire multi-gigabyte archive just to retrieve one or two files, select the specific members you need and pressF5. ATBCmder unpacks only those chosen items directly into the inactive panel.
Note
When previewing or copying individual files from an archive, ATBCmder streams only the requested file bytes directly from the container stream. It does not waste disk space or time unpacking unselected sibling files.
4. Live Repacking: In-Place Editing Inside Archives
One of the most powerful workflows in ATBCmder is Live Repacking. Historically, modifying a single file nested inside a compressed archive required a tedious six-step sequence: extract the entire archive, locate the target file, edit and save it, re-compress the directory into a new archive, delete the original archive, and clean up temporary folders.
ATBCmder makes editing files inside archives as effortless as editing standard local files.
┌────────────────────────────────────────────────────────────────────────────────────────┐
│                              LIVE REPACKING LIFECYCLE                                  │
├────────────────────────────────────────────────────────────────────────────────────────┤
│                                                                                        │
│  1. User presses F4 on "config.json" inside "package.zip"                              │
│     │                                                                                  │
│     ├──► ATBCmder extracts "config.json" to sandbox: /tmp/dc_repack_xyz/config.json    │
│     └──► Opens internal EditorDialog with window title: "config.json — Editor"         │
│                                                                                        │
│  2. User modifies file and presses Cmd+S (Save)                                        │
│     │                                                                                  │
│     ├──► Editor emits file_saved signal                                                │
│     └──► RepackWorker checks original archive size vs ArchiveRepackWarningMB threshold │
│                                                                                        │
│  3. Atomic Repack Execution                                                            │
│     │                                                                                  │
│     ├──► Writes modified stream to staging archive: /tmp/package.zip.tmp               │
│     ├──► Validates container integrity via archive driver                              │
│     ├──► Atomic swap: os.replace("/tmp/package.zip.tmp", "/original/package.zip")      │
│     └──► Refreshes active file panel and cleans up sandbox /tmp/dc_repack_xyz/         │
│                                                                                        │
└────────────────────────────────────────────────────────────────────────────────────────┘
4.1 Step-by-Step: Editing an Archived Configuration File
- Navigate into the archive (e.g.,
application_bundle.zip) by pressingEnter. - Locate the file you wish to modify (e.g.,
settings.yaml). - Press
F4(Fn+F4). ATBCmder extracts the file into a temporary cache and launches the built-in Editor. - Make your modifications in the editor.
- Press
Cmd+S(⌘S) to save. - Close the editor with
Cmd+W(⌘W) orEsc. - ATBCmder's
RepackWorkerautomatically updates the internal member, compresses the updated structure to a temporary file, atomically replaces the original archive, and refreshes the panel view.
Caution
Large Archive Safety Guard (ArchiveRepackWarningMB)
Repacking a compressed archive requires decompressing and re-encoding container streams. Modifying a 10 KB file inside a 20 GB .tar.gz video archive would force the computer to rewrite all 20 GB of data.
To prevent accidental disk freezes, ATBCmder includes a protective safety threshold (ArchiveRepackWarningMB, default: 100 MB in atbcmder.xml). If you attempt to edit or delete a file inside an archive larger than this limit, ATBCmder displays a confirmation prompt:
"Modifying this archive requires re-packing the entire file, which may take a long time. Do you wish to continue?"
5. Creating & Extracting Archives (Alt+F5 / Alt+F9)
ATBCmder provides dedicated background workers for creating and extracting archives, ensuring your file panels remain responsive even during long-running compression jobs.
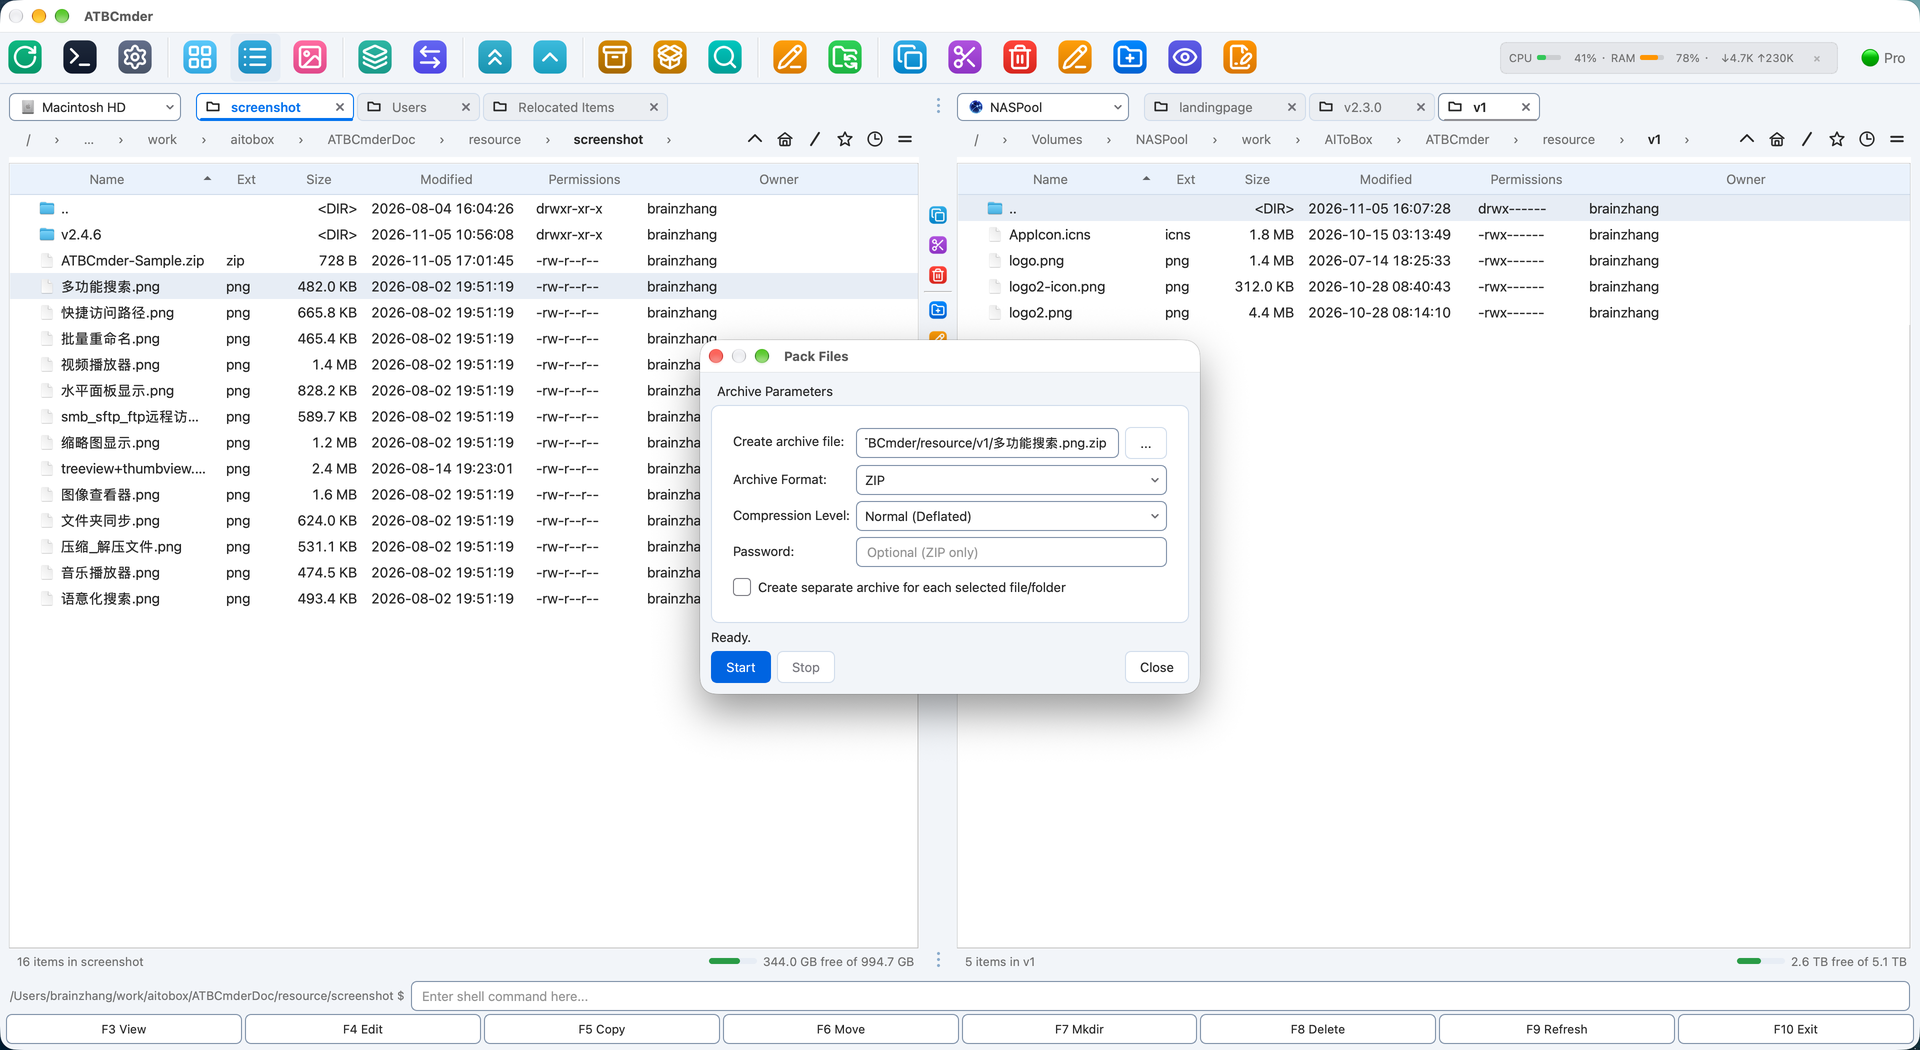
Figure 6.2: The Archive Parameters dialog (Alt+F5 / cm_PackFiles) showing destination path, format selection, compression levels, and password encryption.
5.1 Compressing Files (Alt+F5 / ⌥F5 / cm_PackFiles)
To create a new archive:
- In the active panel, select the files or directories you wish to bundle.
- Press
Alt+F5(⌥F5) or choose Files ➔ Pack... from the menu bar. - The Pack Files dialog appears:
- Create archive file: Destination filepath. By default, ATBCmder suggests placing the archive in the inactive panel's directory, named after the focused item.
- Archive Format: Choose between
ZIP,TAR,TAR.GZ,TAR.BZ2,TAR.XZ, or7Z. - Compression Level:
Store: Zero compression; instant packaging for pre-compressed media (MP4, JPEG).Fast: Low CPU overhead; ideal for quick transfers.Normal (Deflated): Balanced speed and compression ratio (recommended for general use).Maximum: Highest density compression (utilizes LZMA/Bzip2 where applicable).
- Password (ZIP only): Enter a secret passphrase to encrypt the archive.
- Click Start (or press
Enter). The operation runs in a non-blocking background thread with a progress bar and file-by-file status indicator.
Military-Grade AES-256 Password Encryption
Standard ZIP encryption (legacy ZipCrypto) is cryptographically broken and vulnerable to plaintext dictionary attacks. When you specify a password for a ZIP archive, ATBCmder utilizes AES-256 encryption powered by pyzipper (pyzipper.AESZipFile with WZ_AES standard). This ensures compatibility with macOS, WinZip, and 7-Zip while protecting sensitive data against brute-force decryption.
Splitting Huge Archives across Multi-Volume Sets
If you need to distribute an archive across email attachments, FAT32 drives, or cloud upload boundaries with file size caps:
- Bundle your files using
Alt+F5(cm_PackFiles). - Highlight the resulting
.zipor.tararchive and trigger the File Splitter viaAlt+F6(cm_FileSpliter). - Select a preset split size (e.g.,
100 MB,4.7 GB DVD,CD 700 MB, or custom byte size). - ATBCmder generates numbered split pieces (
archive.zip.001,archive.zip.002, etc.) along with a CRC32 verification manifest. Recipients can reassemble the original container at any time usingcm_FileLinker(cm_Combine).
5.2 Extracting Archives (Alt+F9 / ⌥F9 / cm_ExtractFiles)
To extract archives to disk:
- Highlight one or more archives in the active panel.
- Press
Alt+F9(⌥F9) or choose Files ➔ Extract... from the menu bar. - The Extract Files dialog displays:
- Archive to extract: Selected container source path.
- Extract to directory: Destination directory (defaults to the inactive panel).
- Preview Contents: An interactive list box loading archive members in real time.
- Password: Input field for password-protected archives.
- Click Start. If any target file already exists in the destination folder, ATBCmder pauses the worker and presents an interactive collision dialog:
- Overwrite: Replaces the conflicting destination file.
- Skip: Leaves the existing file untouched and proceeds to the next item.
- Overwrite All: Silently overwrites all subsequent conflicts.
- Skip All: Automatically bypasses all existing destination files.
- Cancel: Safely halts the extraction process.
6. Remote Network VFS: Protocols & Remote Storage
ATBCmder includes a multi-protocol network client engine capable of mounting, browsing, and manipulating remote servers directly inside the dual-panel workspace.
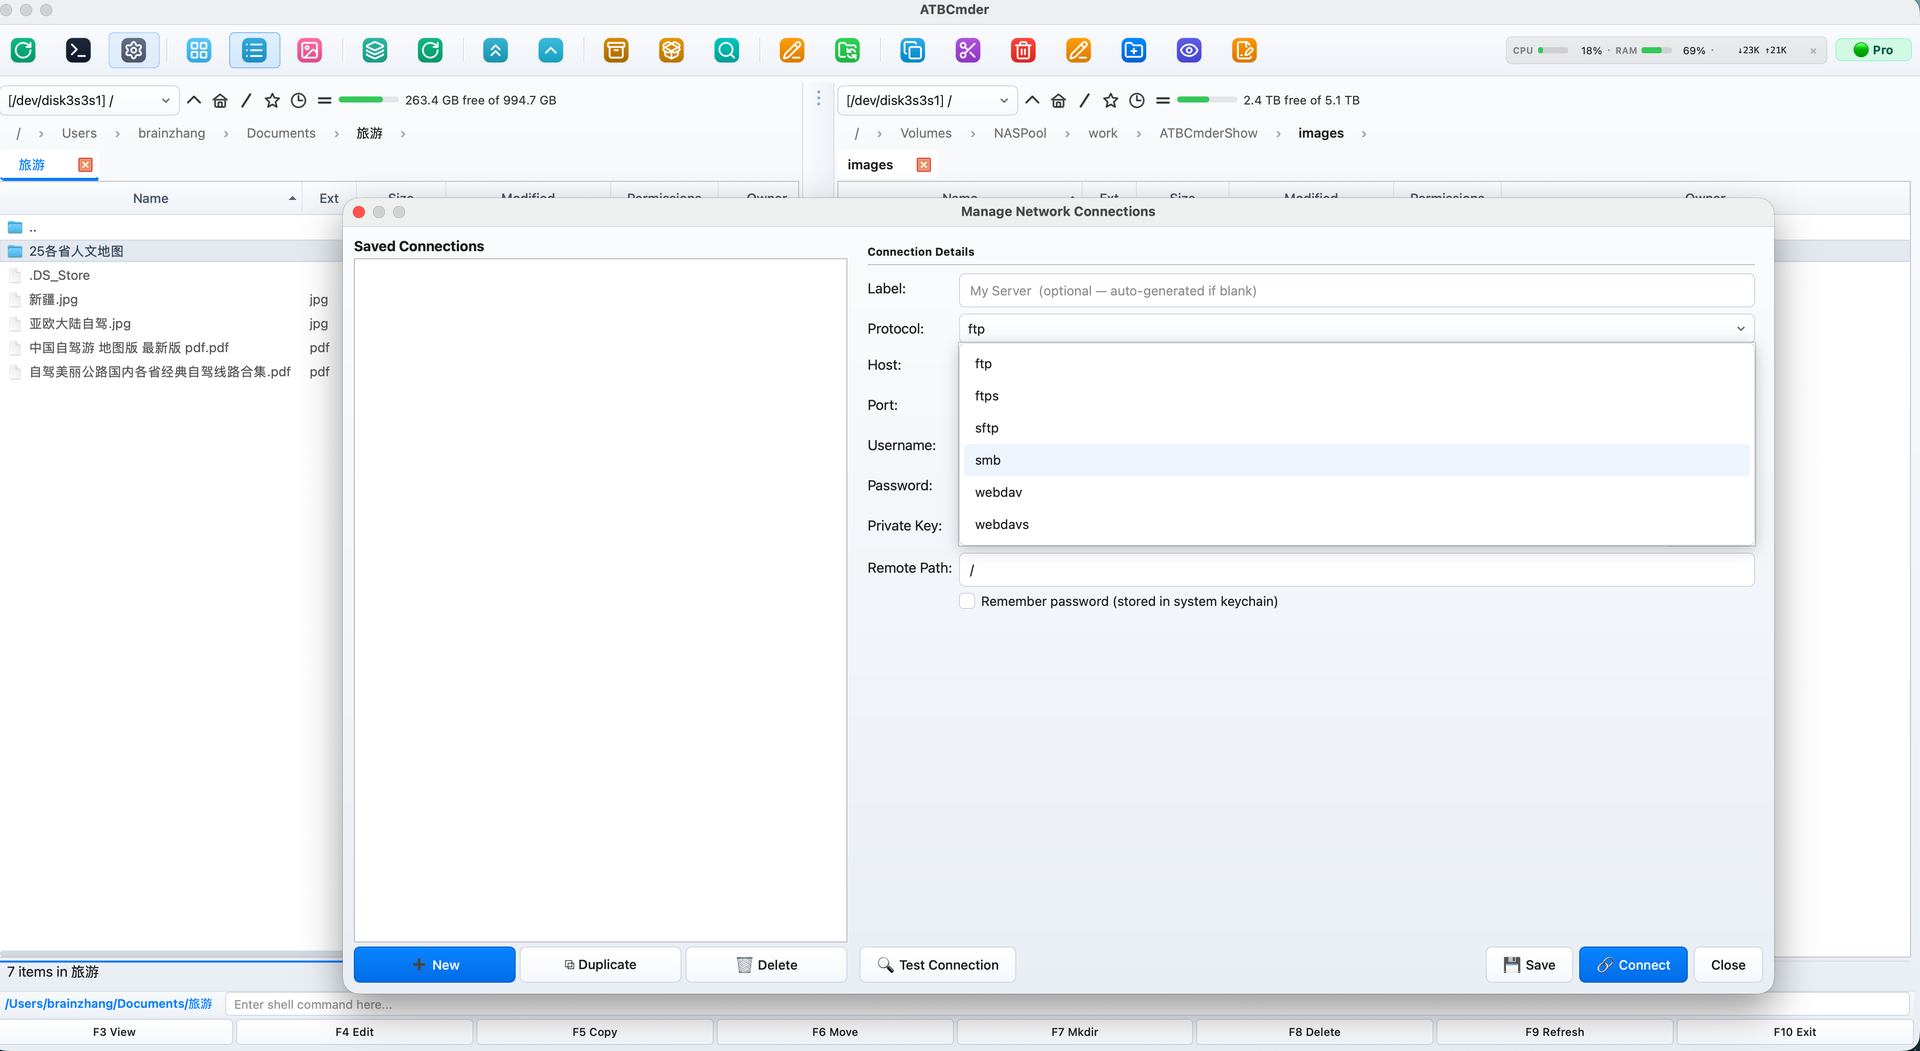
Figure 6.3: Browsing remote Linux server directories over secure SFTP with live file attributes, ownership permissions, and dual-panel transfer.
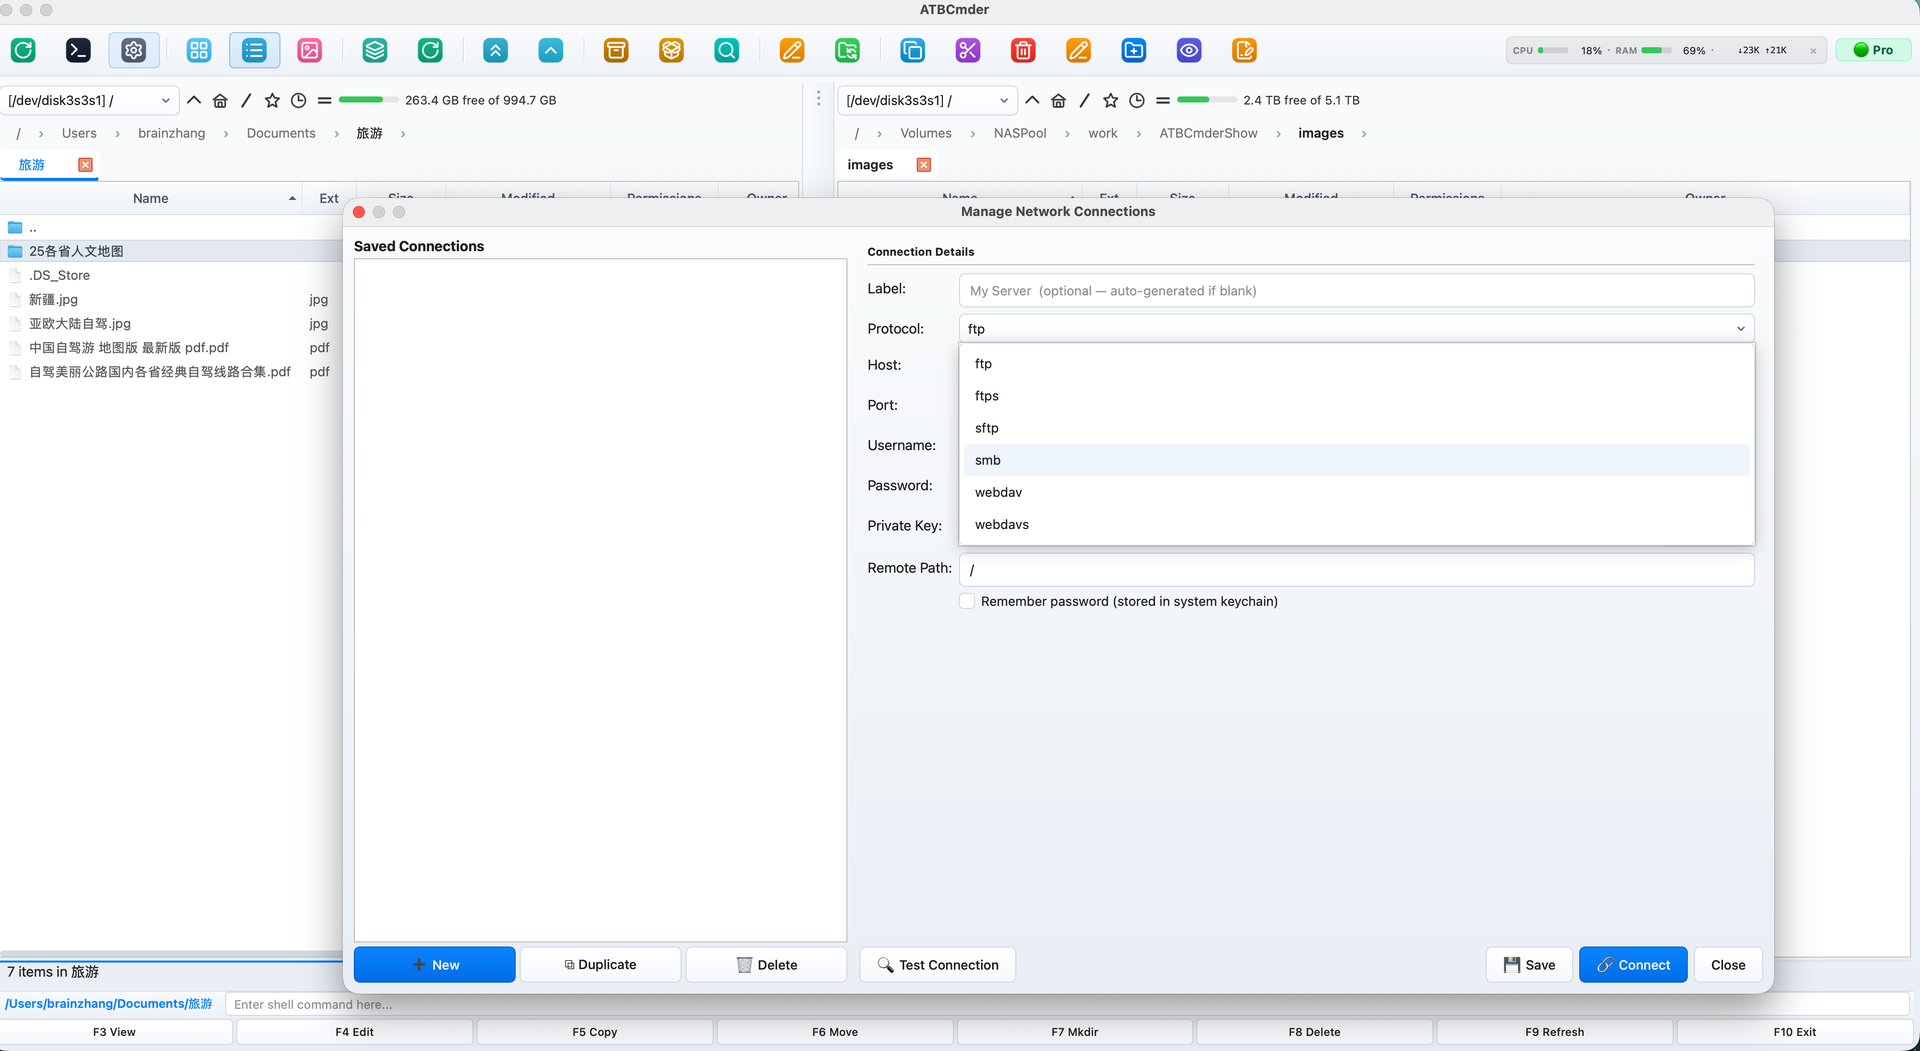
Figure 6.4: Supported network connection types: FTP/FTPS, secure SFTP, WebDAV cloud storage, and SMB network shares.
6.1 Supported Network Protocols
| Protocol Scheme | Default Port | Transport Layer | Authentication Modes | Best Used For |
|---|---|---|---|---|
sftp:// |
22 |
SSH-2 (Paramiko) | Password, SSH Key (id_rsa, id_ed25519) |
Linux servers, cloud instances, staging hosts |
ftp:// |
21 |
Plain RFC 959 | Anonymous, Cleartext Username & Password | Legacy web hosting, local lab devices |
ftps:// |
990 |
TLS-Encrypted FTP | Username & Password with SSL/TLS | Secure commercial FTP servers |
smb:// |
445 |
CIFS / SMB3 | Windows NT / Kerberos / Local Account | Windows shares, NAS appliances, Samba servers |
webdav:// |
80 |
HTTP WebDAV | Basic, Digest Authentication | Web servers, local network storage |
webdavs:// |
443 |
HTTPS WebDAV | SSL-Encrypted Basic / Digest Auth | Nextcloud, ownCloud, commercial cloud storage |
gdrive:// |
443 |
Google Drive API | OAuth2 Token Authorization | Google Drive cloud drives and shared folders |
dropbox:// |
443 |
Dropbox API v2 | OAuth2 Token Authorization | Dropbox personal and team cloud folders |
6.2 Protocol Capabilities & Deep Dive
SFTP (SSH File Transfer Protocol)
Backed by the industry-standard paramiko SSH engine, ATBCmder's SFTP driver establishes encrypted tunnels over port 22:
- Host Key Safety (
WarningPolicy): In compliance with strict security requirements, ATBCmder automatically consults your local~/.ssh/known_hostsfile. When connecting to a known host, host keys are cryptographically verified. If an unknown server is encountered, ATBCmder emits a safety warning rather than silently trusting unexpected public keys. - SSH Key Authentication: In addition to standard password authentication, ATBCmder supports SSH private key files (
~/.ssh/id_rsa,~/.ssh/id_ed25519). - UNIX Attribute Mapping: Preserves remote octal file modes (
chmod), user/group ownership strings, and exact POSIX modification timestamps.
FTP & FTPS (Explicit / Implicit SSL)
Driven by Python's ftplib, the FTP driver supports:
- Passive Mode (PASV): Enabled by default to ensure reliable connections through restrictive NAT routers and consumer firewalls.
- Configurable Encodings: Resolves non-ASCII filename display issues by allowing you to switch between
UTF-8,ISO-8859-1,GB18030, andWindows-1252character sets.
SMB / Samba (Windows Shares & NAS Appliances)
Unlike naive userspace Python SMB libraries that suffer from slow transfer speeds, ATBCmder employs a hybrid architecture:
- macOS Native Kernel Acceleration (
mount_smbfs): On macOS, ATBCmder'sSambaMounterleverages Apple's native/sbin/mount_smbfssubsystem. It mounts the remote share directly into the macOS VFS tree (/Volumes/or an isolated mount directory), unlocking full hardware-accelerated SMB3 read/write throughput. - Existing Mount Detection: If macOS Finder or a system script has already mounted the target SMB share, ATBCmder automatically detects the active mountpoint from the OS
mounttable and navigates to it instantly, avoiding redundant network connections.
Important
SMB Share Name Requirement
An SMB server cannot be browsed at the bare hostname level. An SMB URI must include the target share or export name in the path:
- ❌ Invalid:
vfs://smb://nas.local/ - ✅ Valid:
vfs://smb://nas.local/StoragePoolorvfs://smb://192.168.1.100/Media
WebDAV & WebDAVS (Nextcloud / Cloud Storage)
Built on webdavclient3, this driver provides bidirectional file synchronization with modern cloud storage solutions:
- SSL Certificate Verification: Supports strict SSL certificate validation for public WebDAVS hosts, with an override toggle for self-signed certificates in private homelab setups.
- Recursive Directory Creation (
makedirs): Automatically creates missing nested remote directory paths during bulk upload operations.
6.3 Google Drive Cloud Storage: Plain-English Setup Guide
Managing Google Drive through a web browser often feels sluggish when uploading large files or organizing dozens of nested folders. Furthermore, the official Google Drive desktop app typically tries to sync entire folder trees to your local Mac SSD, consuming valuable storage space.
ATBCmder solves this by treating Google Drive as a live virtual drive (gdrive://). You can browse your remote Google Drive folders directly inside the dual-panel interface, preview cloud files with F3, and copy files between your Mac and Google Drive with F5—without downloading your entire cloud drive to your computer.
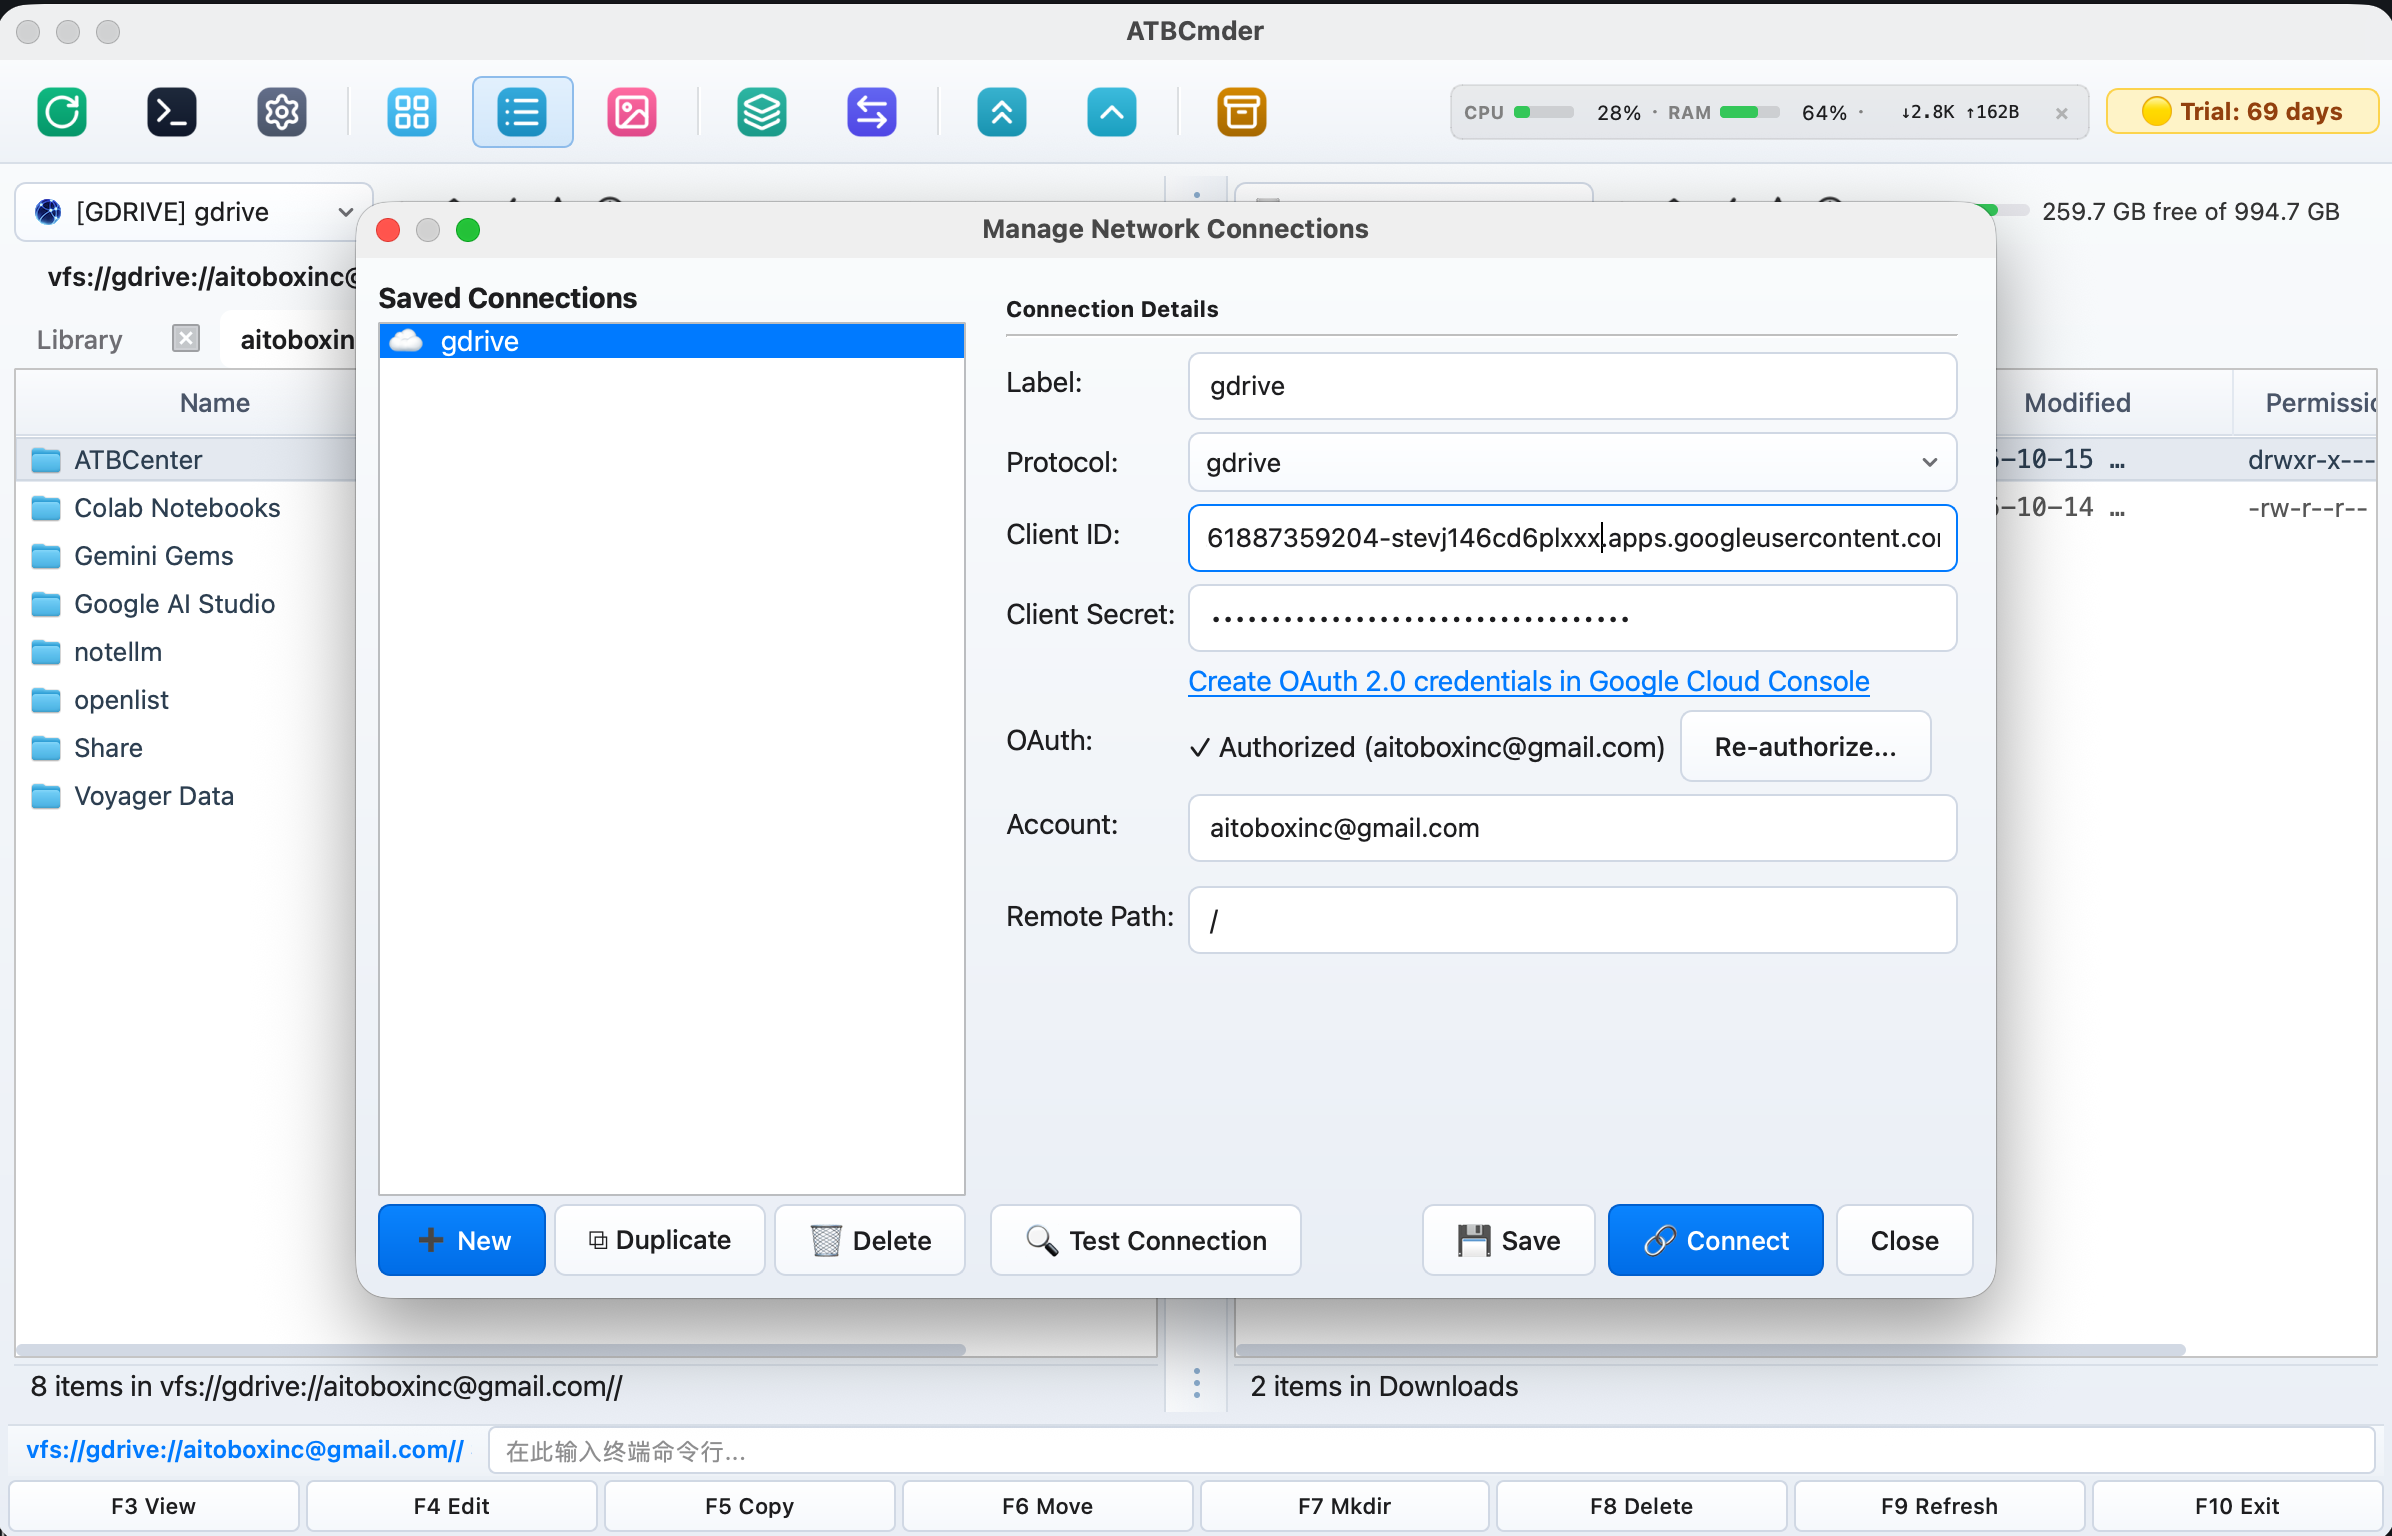
Figure 6.5: Connecting to Google Drive via Connection Manager with OAuth2 client credentials and browsing cloud files alongside local folders in the dual-panel view.
Why Do I Need a "Client ID" and "Client Secret"?
To protect your privacy and security, Google does not permit third-party desktop apps to ask for your Google account password directly. Instead, Google uses OAuth 2.0 authorization.
By creating your own free OAuth credentials in the Google Cloud Console:
- 100% Private & Direct: Your data flows directly between your Mac and Google's official servers. No third party or intermediary server ever sees your files or credentials.
- Dedicated Speed & Quota: You get your own private API bandwidth without sharing rate limits with thousands of other users.
- Revocable Anytime: You remain in total control. You can revoke ATBCmder's access with a single click in your Google Account security dashboard at any time.
Setting this up takes less than 3 minutes, and you only ever have to do it once!
Step 1: Create Free Credentials in Google Cloud (Takes 2 Minutes)
- Open Google Cloud Console — Credentials in your web browser and sign in with your Google account.
- Select or Create a Project:
- At the top of the page, click the organization / project dropdown.
- (Tip for Organizations: If you have a Google Workspace or Cloud Identity organization such as
aitobox.com, select that organization in the dropdown so the project is created under your company domain). - If you do not have a project yet, click New Project, name it anything you like (e.g.,
ATBCmder), and click Create. - Enable the Google Drive API:
- In the left sidebar or top search bar, go to Enabled APIs & services (or click + ENABLE APIS AND SERVICES).
- Search for Google Drive API, click it, and click the blue Enable button.
- Configure the OAuth Consent Screen (if prompted):
- If this is your first time creating credentials, Google may prompt you to configure the consent screen:
- Select External and click Create.
- Fill in an App name (e.g.,
ATBCmder) and enter your email address for user support and developer contact. - Under App domain, set the Application home page to your site (e.g.,
https://cmder.aitobox.com). - Under Authorized domains, add your root domain (e.g.,
aitobox.com). - Click Save and Continue through the remaining screens.
- Create your Desktop Credentials:
- Return to APIs & Services ➔ Credentials.
- Click + Create Credentials at the top of the screen and choose OAuth client ID.
- In the Application type dropdown, select Desktop app (桌面应用).
- In the Name field, enter
ATBCmder Desktop(or any friendly name). - Click Create.
- Copy Your Keys:
- A dialog will appear displaying your Client ID (ending in
.apps.googleusercontent.com) and your Client Secret. - Copy both strings (or keep the browser tab open—you can also view or copy them at any time later from the Credentials page).
Custom Branding: Understanding "Access Granted To" (访问权限授予对象)
When you view connected third-party applications in your Google Account security center (myaccount.google.com/connections), Google displays an App Details card for ATBCmder:
- App Name:
ATBCmder - Access granted to (访问权限授予对象): e.g.,
aitobox.comoroplist.org - Homepage (首页):
https://cmder.aitobox.com
Why Does Google Show a Specific Organization Name?
The "Access granted to" (访问权限授予对象) line is automatically determined by Google based on the Google Cloud Organization (or Google Workspace account) that owns the GCP project where your OAuth Client ID was created:
- If your Client ID was created in a Google Cloud project under a third-party organization (such as
oplist.org), Google will show that organization's domain to notify the user who owns the API client. - If the project was created under a personal Google account, Google displays your developer contact identity.
How to Set the Granted Organization to Your Own Domain (e.g., aitobox.com)
If you want Google's account security dashboard to display your own custom company domain (such as aitobox.com):
- Create the Project under your Domain Organization:
- In Google Cloud Console, log in with an account belonging to your company domain (e.g.,
admin@aitobox.com). - In the top organization dropdown, ensure your domain (e.g.,
aitobox.com) is selected before creating the project. - Configure App Domain in OAuth Consent Screen:
- Go to APIs & Services ➔ OAuth consent screen.
- Set Application home page to your official product page (e.g.,
https://cmder.aitobox.com). - Add your root domain under Authorized domains (e.g.,
aitobox.com). - Set your User support email and Developer contact email to your domain address.
- Generate a New Desktop App Client ID:
- Go to APIs & Services ➔ Credentials and create a new OAuth client ID of type Desktop app.
- Update Keys in ATBCmder:
- Paste the new Client ID and Client Secret into ATBCmder's Connection Manager, then click Authorize / Re-authorize.
- Google will now display your company domain (
aitobox.com) as the granted recipient in your account security settings!
Step 2: Add Google Drive in ATBCmder
Now that you have your keys, connecting ATBCmder takes just a few clicks:
- In ATBCmder, open Network ➔ Manage Connections... from the top menu bar.
- Click the
+ Newbutton in the lower-left corner to start a new profile. - In the Connection Details form on the right:
- Label: Enter a memorable name (e.g.,
Google DriveorWork Drive). - Protocol: Select
gdrivefrom the dropdown menu. - Client ID: Paste the Client ID you copied from Google Cloud.
- Client Secret: Paste the Client Secret you copied from Google Cloud.
- (Optional tip: You can also click the blue helper link
Create OAuth 2.0 credentials in Google Cloud Consoledirectly below the secret field to jump to Google Cloud at any time). - Click the Authorize (or Re-authorize...) button.
- ATBCmder will automatically open your default web browser to Google's official sign-in page.
- Important Security Warning Prompt (Normal & Expected):
Because you created a private developer client ID in your own Google Cloud project rather than downloading a commercial marketplace application, Google will display a security warning screen stating "Google hasn't verified this app" (Google 尚未验证此应用 / 存在安全风险).
This is completely normal and safe. In your browser, simply expand the options (click Advanced / 高级), and click "Go to app (unsafe)" / "Continue anyway" (仍然继续 / 转到应用) to proceed with authorization. - Select your Google account and review the requested permissions (Read/Write access to Google Drive).
- Click Continue / Allow.
- Once approved, the browser will confirm success. Return to ATBCmder, and you will see:
✓ Authorized (your_account@gmail.com)!
Note
Why Does Google Show a Security Risk / Unverified App Warning?
When the browser pops up Google's official authorization page, Google displays a prompt warning that the application has not been verified. This is completely standard for self-created OAuth credentials. Since you created the credentials yourself in your own Google Cloud Console and only you hold the keys, your account and files remain 100% secure and private. In the browser, expand the options (click Advanced / 高级) and click "Go to app (unsafe)" / "Continue anyway" (仍然继续) to proceed to the next authorization step.
- Click 💾 Save to bookmark this connection, then click 🔗 Connect (or double-click the connection in the left list).
- A new panel tab immediately opens pointing to: All your Google Drive files and folders are now right in front of you!
Step 3: Working with Google Drive Like a Local Drive
Once connected, Google Drive behaves just like any normal folder:
- Browse & Preview: Double-click or press
Enterto open folders. Select any image, PDF, code file, or document and pressF3to preview it instantly in the Universal Lister without saving it locally. - Upload (
F5): Select files or folders in your local panel (e.g., yourDownloadsfolder) and pressF5to upload them straight to the current Google Drive directory. - Download (
F5): Highlight files in your Google Drive panel and pressF5to download them into your local target folder. - Drag & Drop: Drag files and folders between the local panel and the Google Drive panel with your mouse.
- Instant Refresh (
F9/Ctrl+R): If a colleague shares a new file or you make changes via your phone, pressF9(or click the Refresh button on the toolbar) to fetch the latest cloud changes instantly. - Live Cloud Storage Meter: The status capsule in the top-right toolbar displays your Google Drive storage quota in real time (e.g.,
259.7 GB free of 994.7 GB), keeping you informed of your remaining cloud capacity at a glance. - Multiple Accounts: You can add multiple Google Drive profiles in the Connection Manager (e.g.,
Personal DriveandWork Drive). You can even open one account in the Left Panel and another in the Right Panel to transfer files directly between them! - Zero Plaintext Credentials: Your Client Secret and OAuth authentication tokens are stored securely in the macOS System Keychain (
ATBCmder_VFS) backed by Apple's Secure Enclave. They are never written to disk in plain text.
6.4 Dropbox Cloud Storage: Plain-English Setup Guide
Like Google Drive, accessing Dropbox directly inside ATBCmder gives you the freedom to browse, upload, and organize cloud files without needing to sync hundreds of gigabytes to your local Mac SSD.
ATBCmder treats Dropbox as a live virtual drive (dropbox://), allowing you to preview photos and documents with F3, stream chunked uploads and downloads with F5, and monitor your real-time cloud storage quota right inside the toolbar.
Why Do I Need an "App Key" and "App Secret"?
To protect your privacy and security, Dropbox does not permit third-party desktop tools to ask for or store your Dropbox account password. Instead, Dropbox uses OAuth 2.0 authorization.
By creating your own free developer App Key and App Secret in the official Dropbox App Console:
- 100% Private & Direct: Your data flows directly between your Mac and Dropbox's official servers. No third-party proxy or intermediary server ever sees your files or credentials.
- Dedicated Speed & Quota: You get your own private API bandwidth without sharing rate limits with any other users.
- Revocable Anytime: You remain in total control. You can revoke ATBCmder's access with a single click in your Dropbox account security settings at any time.
Setting this up takes less than 2 minutes, and you only ever have to do it once!
Step 1: Create an App in Dropbox App Console
- Open the Dropbox App Console in your web browser and sign in with your Dropbox account.
- Click the blue Create app button in the top-right corner.
- Configure your app settings according to the screenshot below:
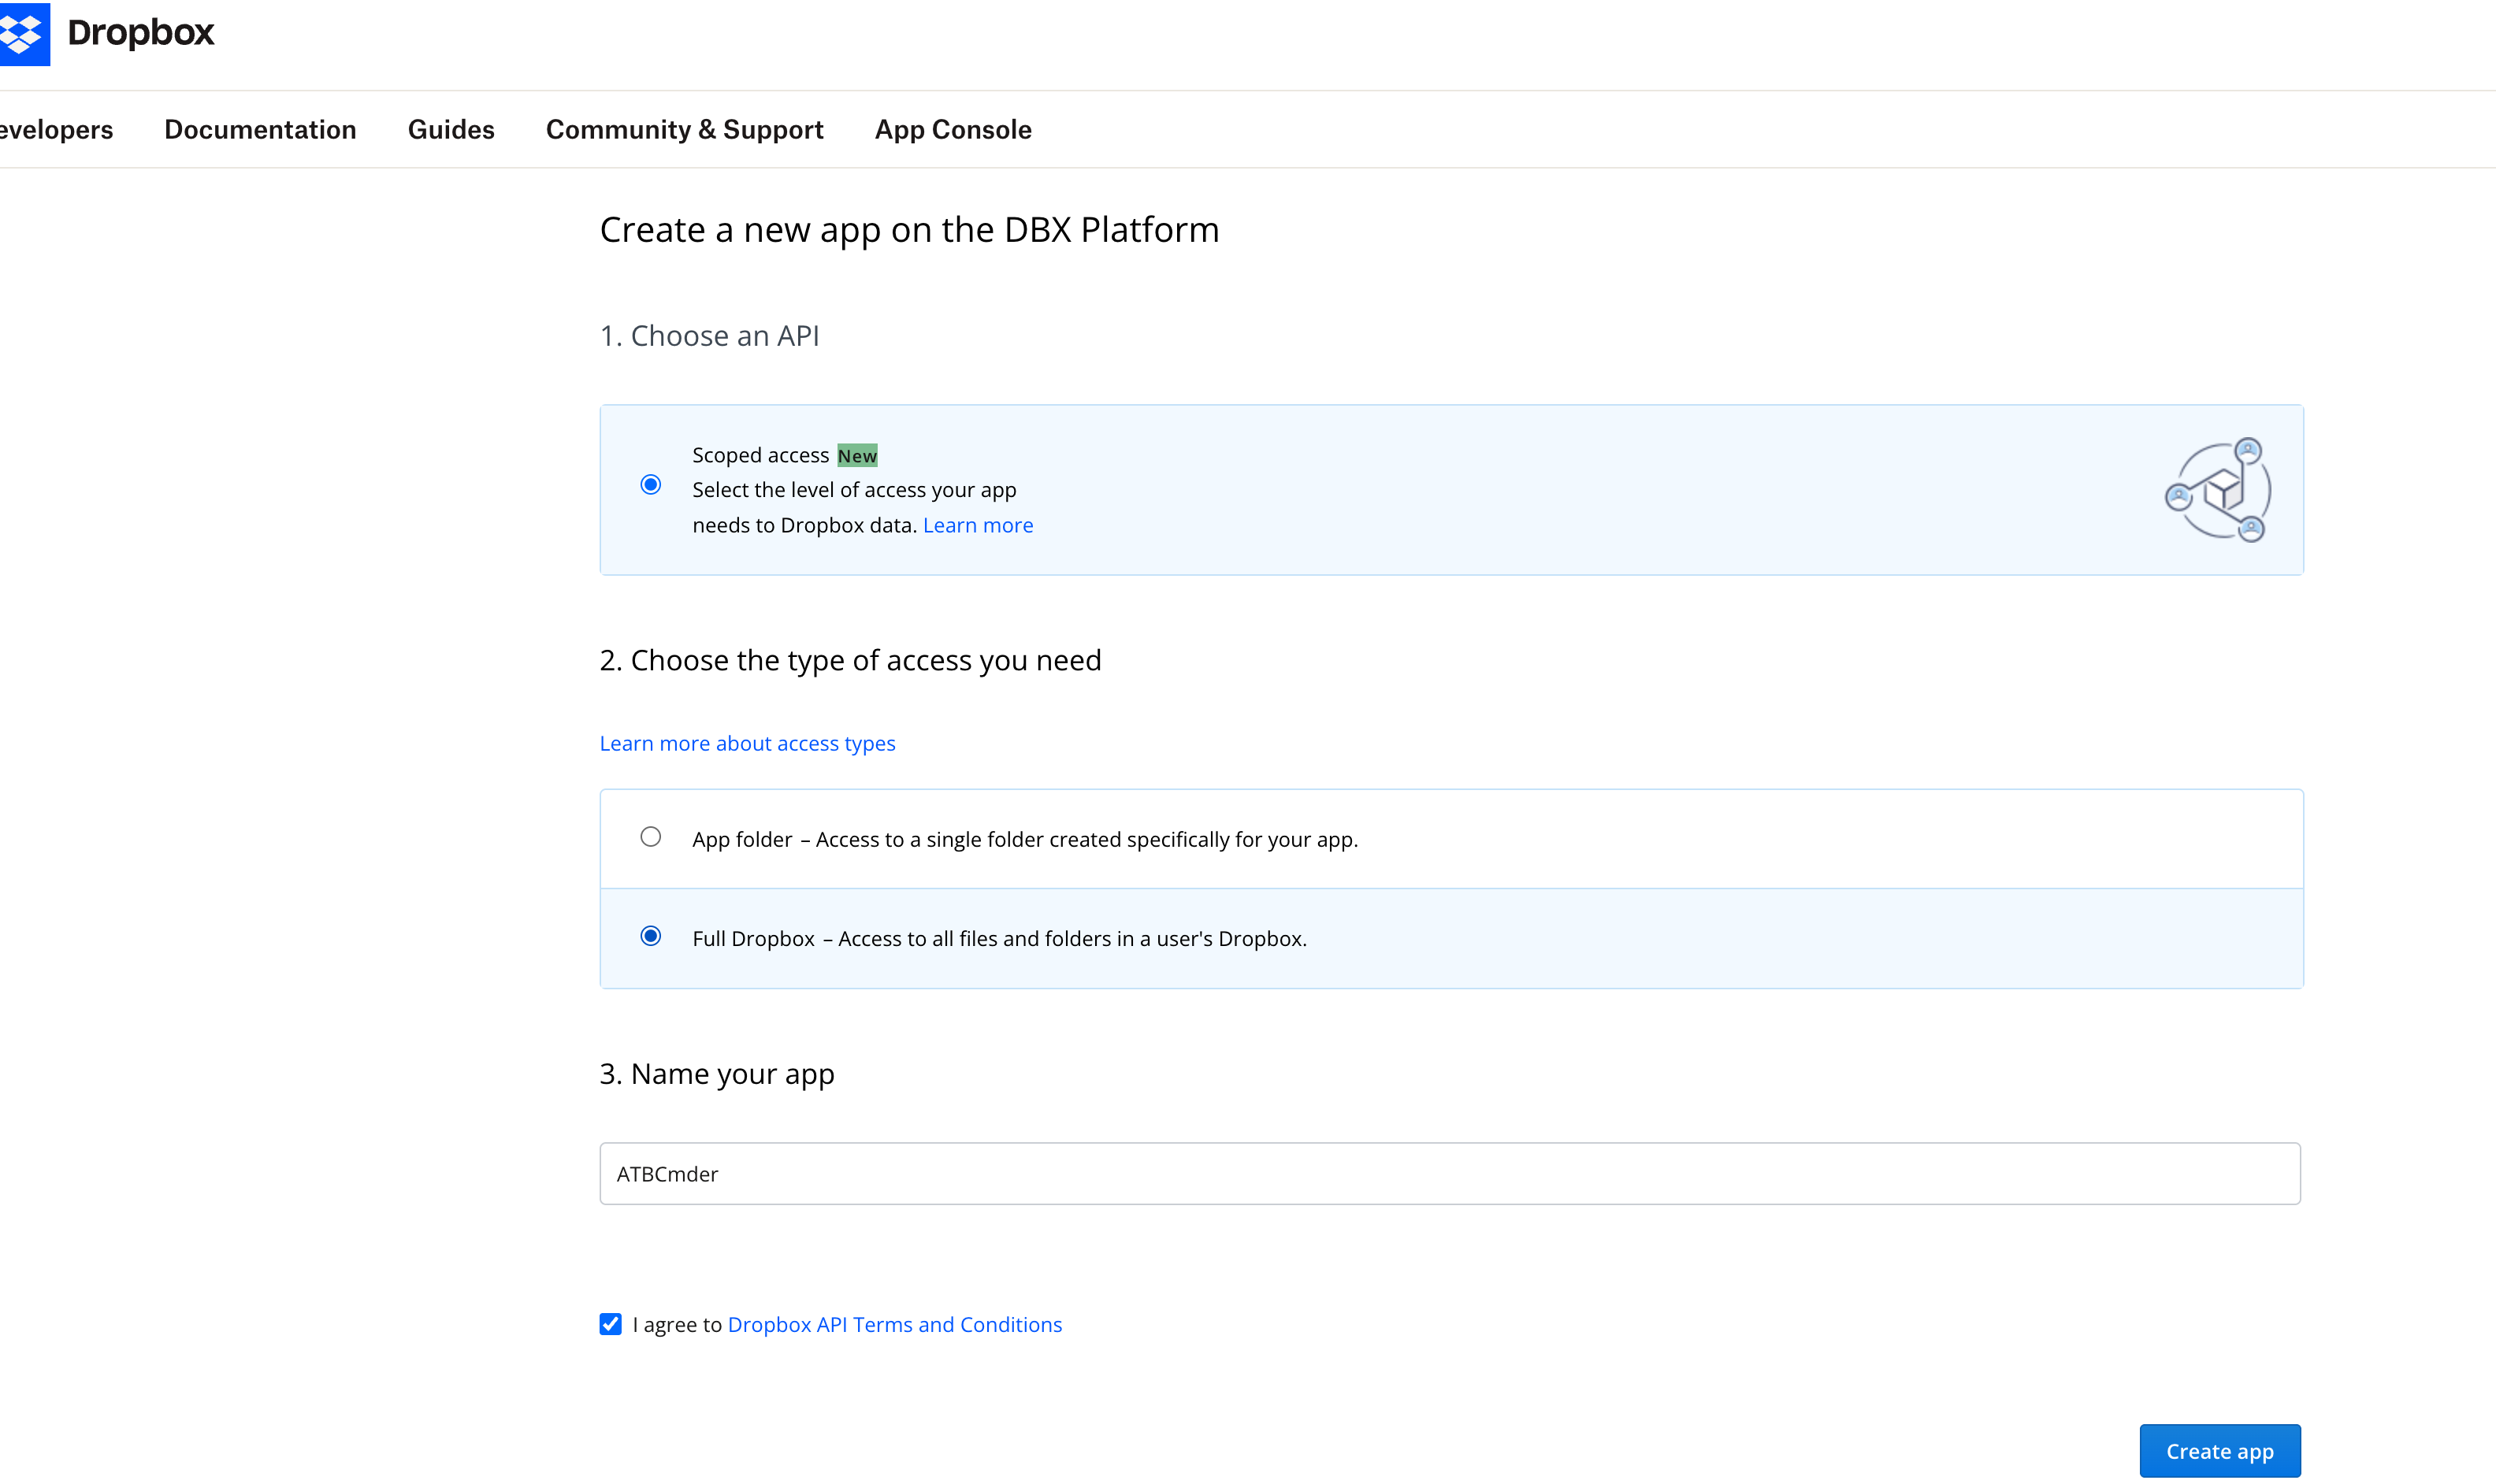
Figure 6.6: Creating a new app in Dropbox App Console with Scoped access and Full Dropbox access.
- 1. Choose an API: Select Scoped access.
- 2. Choose the type of access you need: Select Full Dropbox (Access to all files and folders in your Dropbox).
(Note: If you only want ATBCmder to access a single isolated sandbox folder, you can select "App folder" instead). - 3. Name your app: Enter a unique name for your application (e.g.,
ATBCmderorATBCmder-YourName). - Check the box I agree to Dropbox API Terms and Conditions.
- Click the blue Create app button in the lower-right corner.
Step 2: Configure Redirect URI & Copy Your Keys (Settings Tab)
Once your app is created, you will be taken to its dashboard. Click the Settings tab at the top.
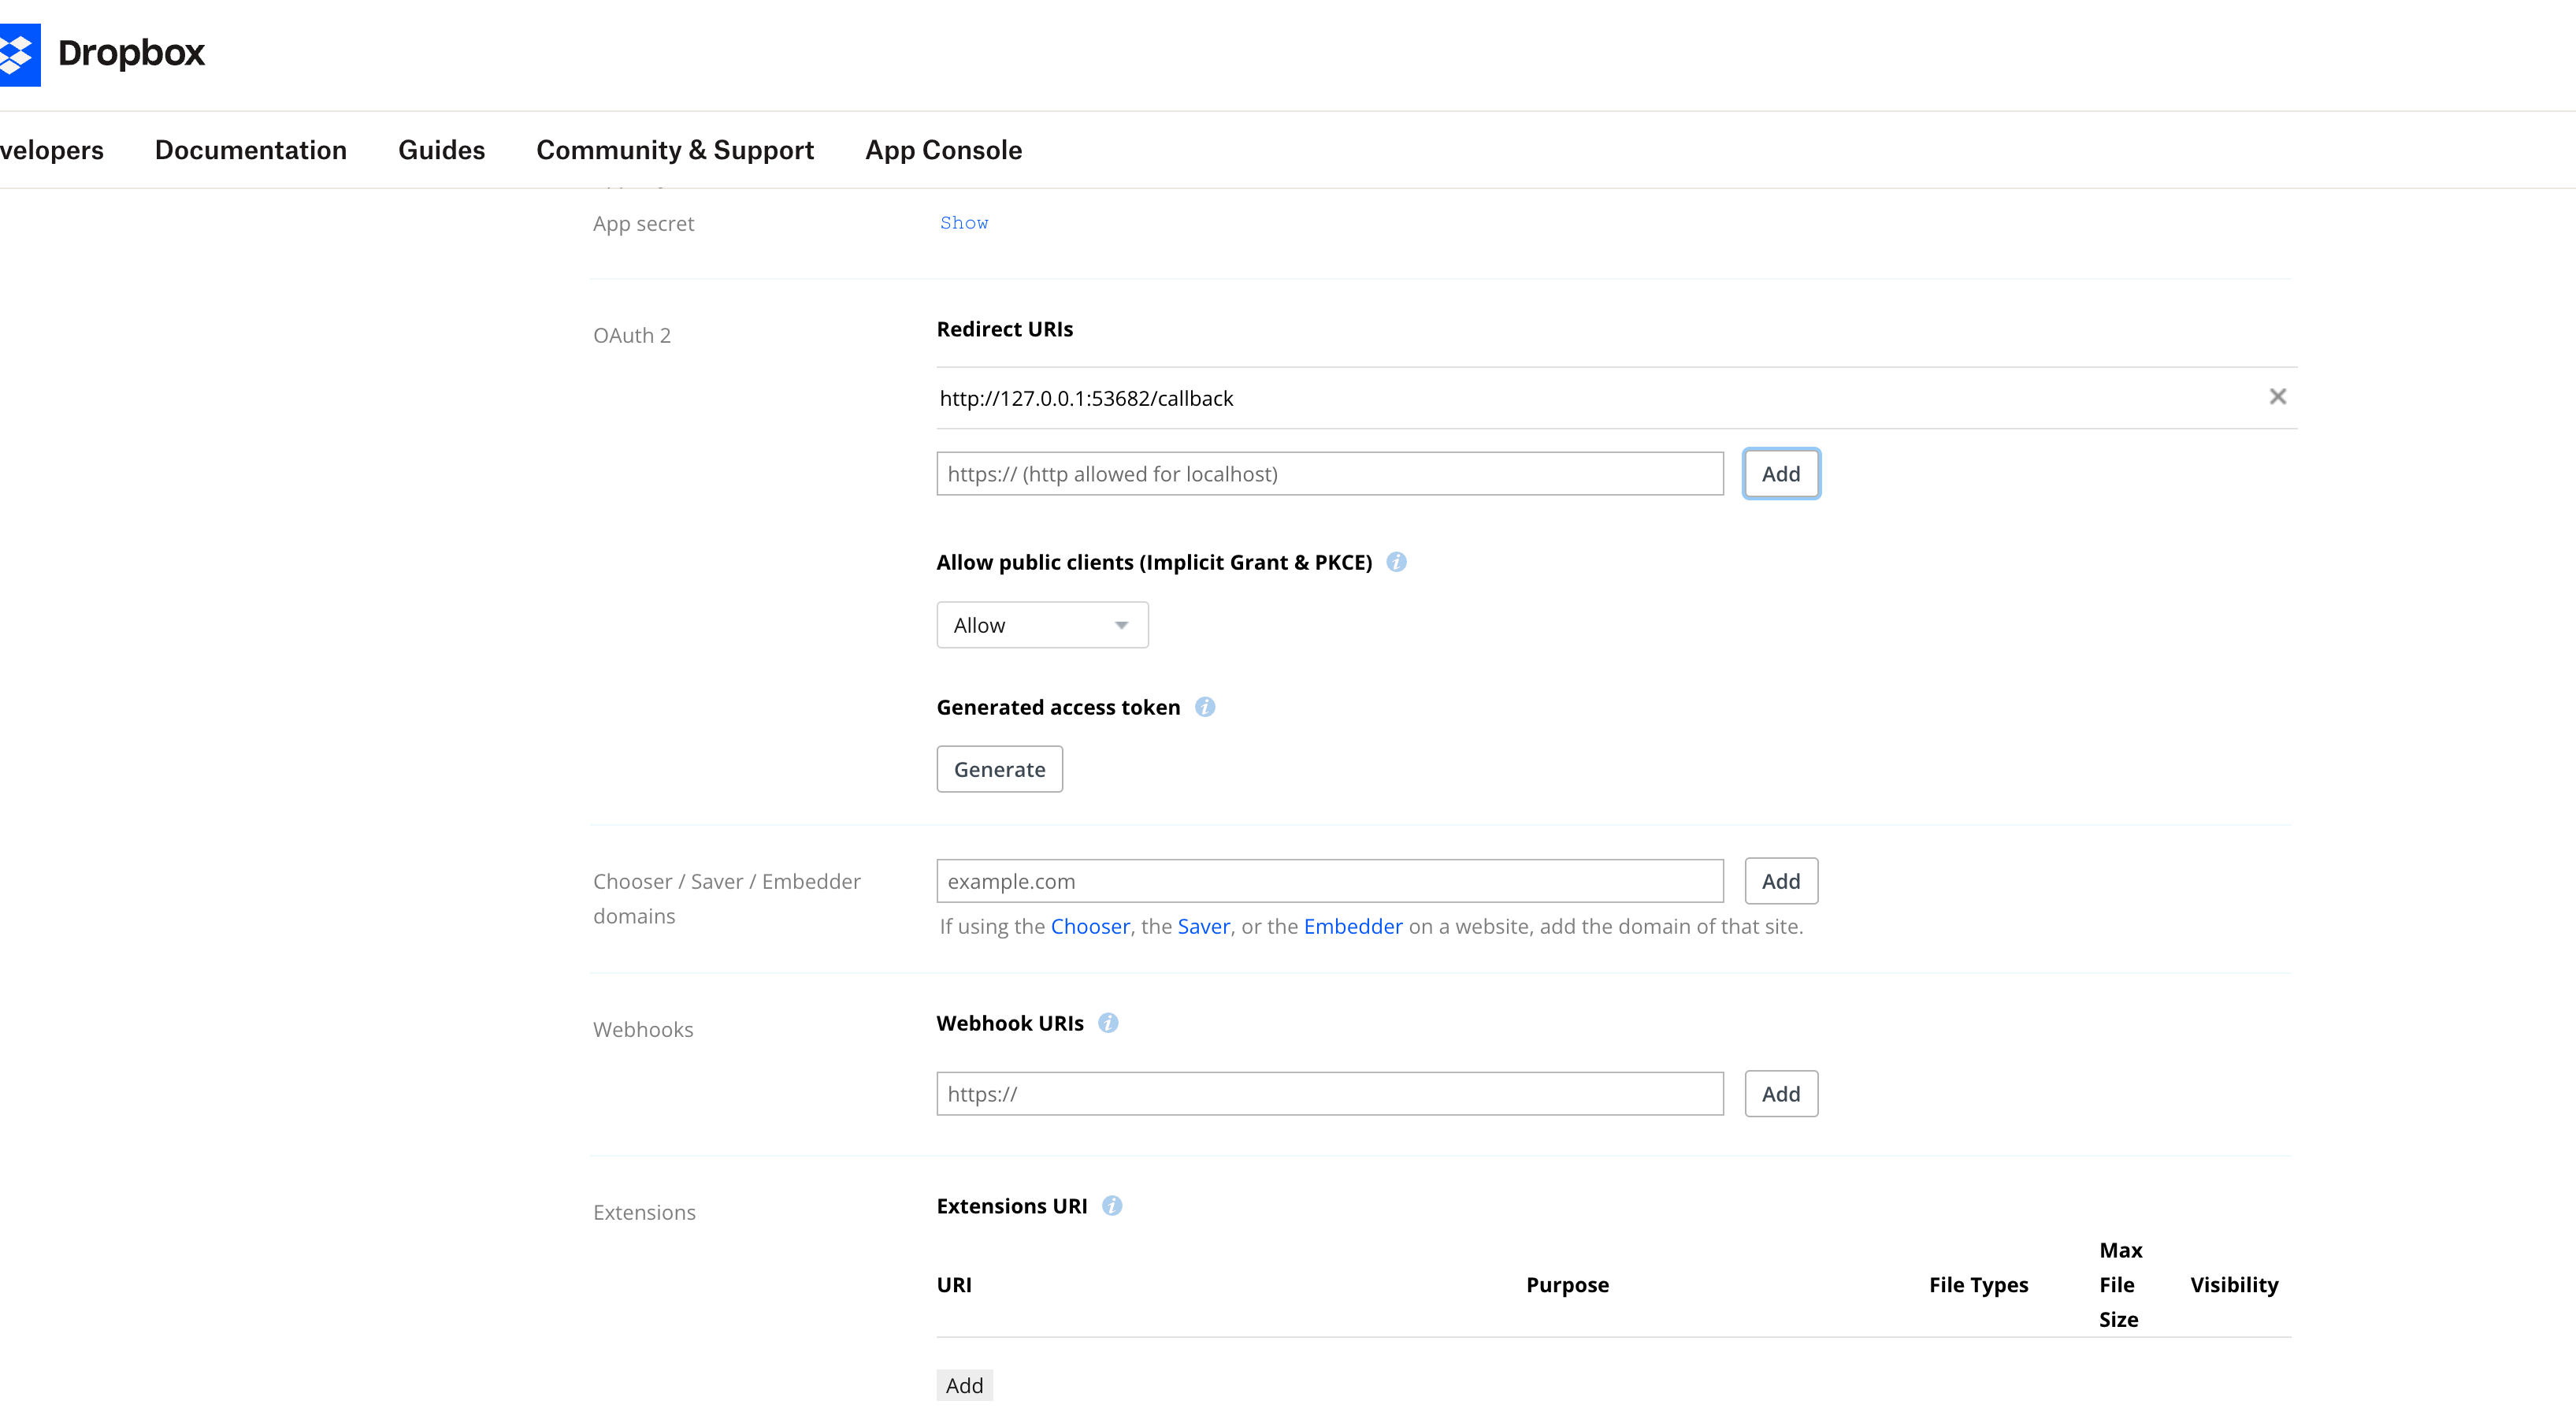
Figure 6.7: Configuring the loopback redirect URI (http://127.0.0.1:53682/callback) and copying your App key and App secret.
- Set the OAuth 2 Redirect URI:
- Scroll down to the OAuth 2 section.
- Locate the Redirect URIs input field.
-
Type or paste the following exact URL:
-
Click the Add button next to the input box.
(Why this is needed: ATBCmder runs a secure local loopback listener on port 53682 during authorization. Registering this URI allows Dropbox to securely return authorization back to ATBCmder with one click). - Allow Public Clients (PKCE):
- Ensure the dropdown for Allow public clients (Implicit Grant & PKCE) is set to Allow (or default).
- Copy Your App Key & App Secret:
- Near the top of the Settings tab, find App key and click to copy it.
- Directly below, find App secret, click the Show link, and copy the secret key.
(Keep this browser window open or save the keys temporarily; you will paste them into ATBCmder in Step 4).
Step 3: Configure Required Permissions (Permissions Tab)
Next, click the Permissions tab at the top of your app settings page.
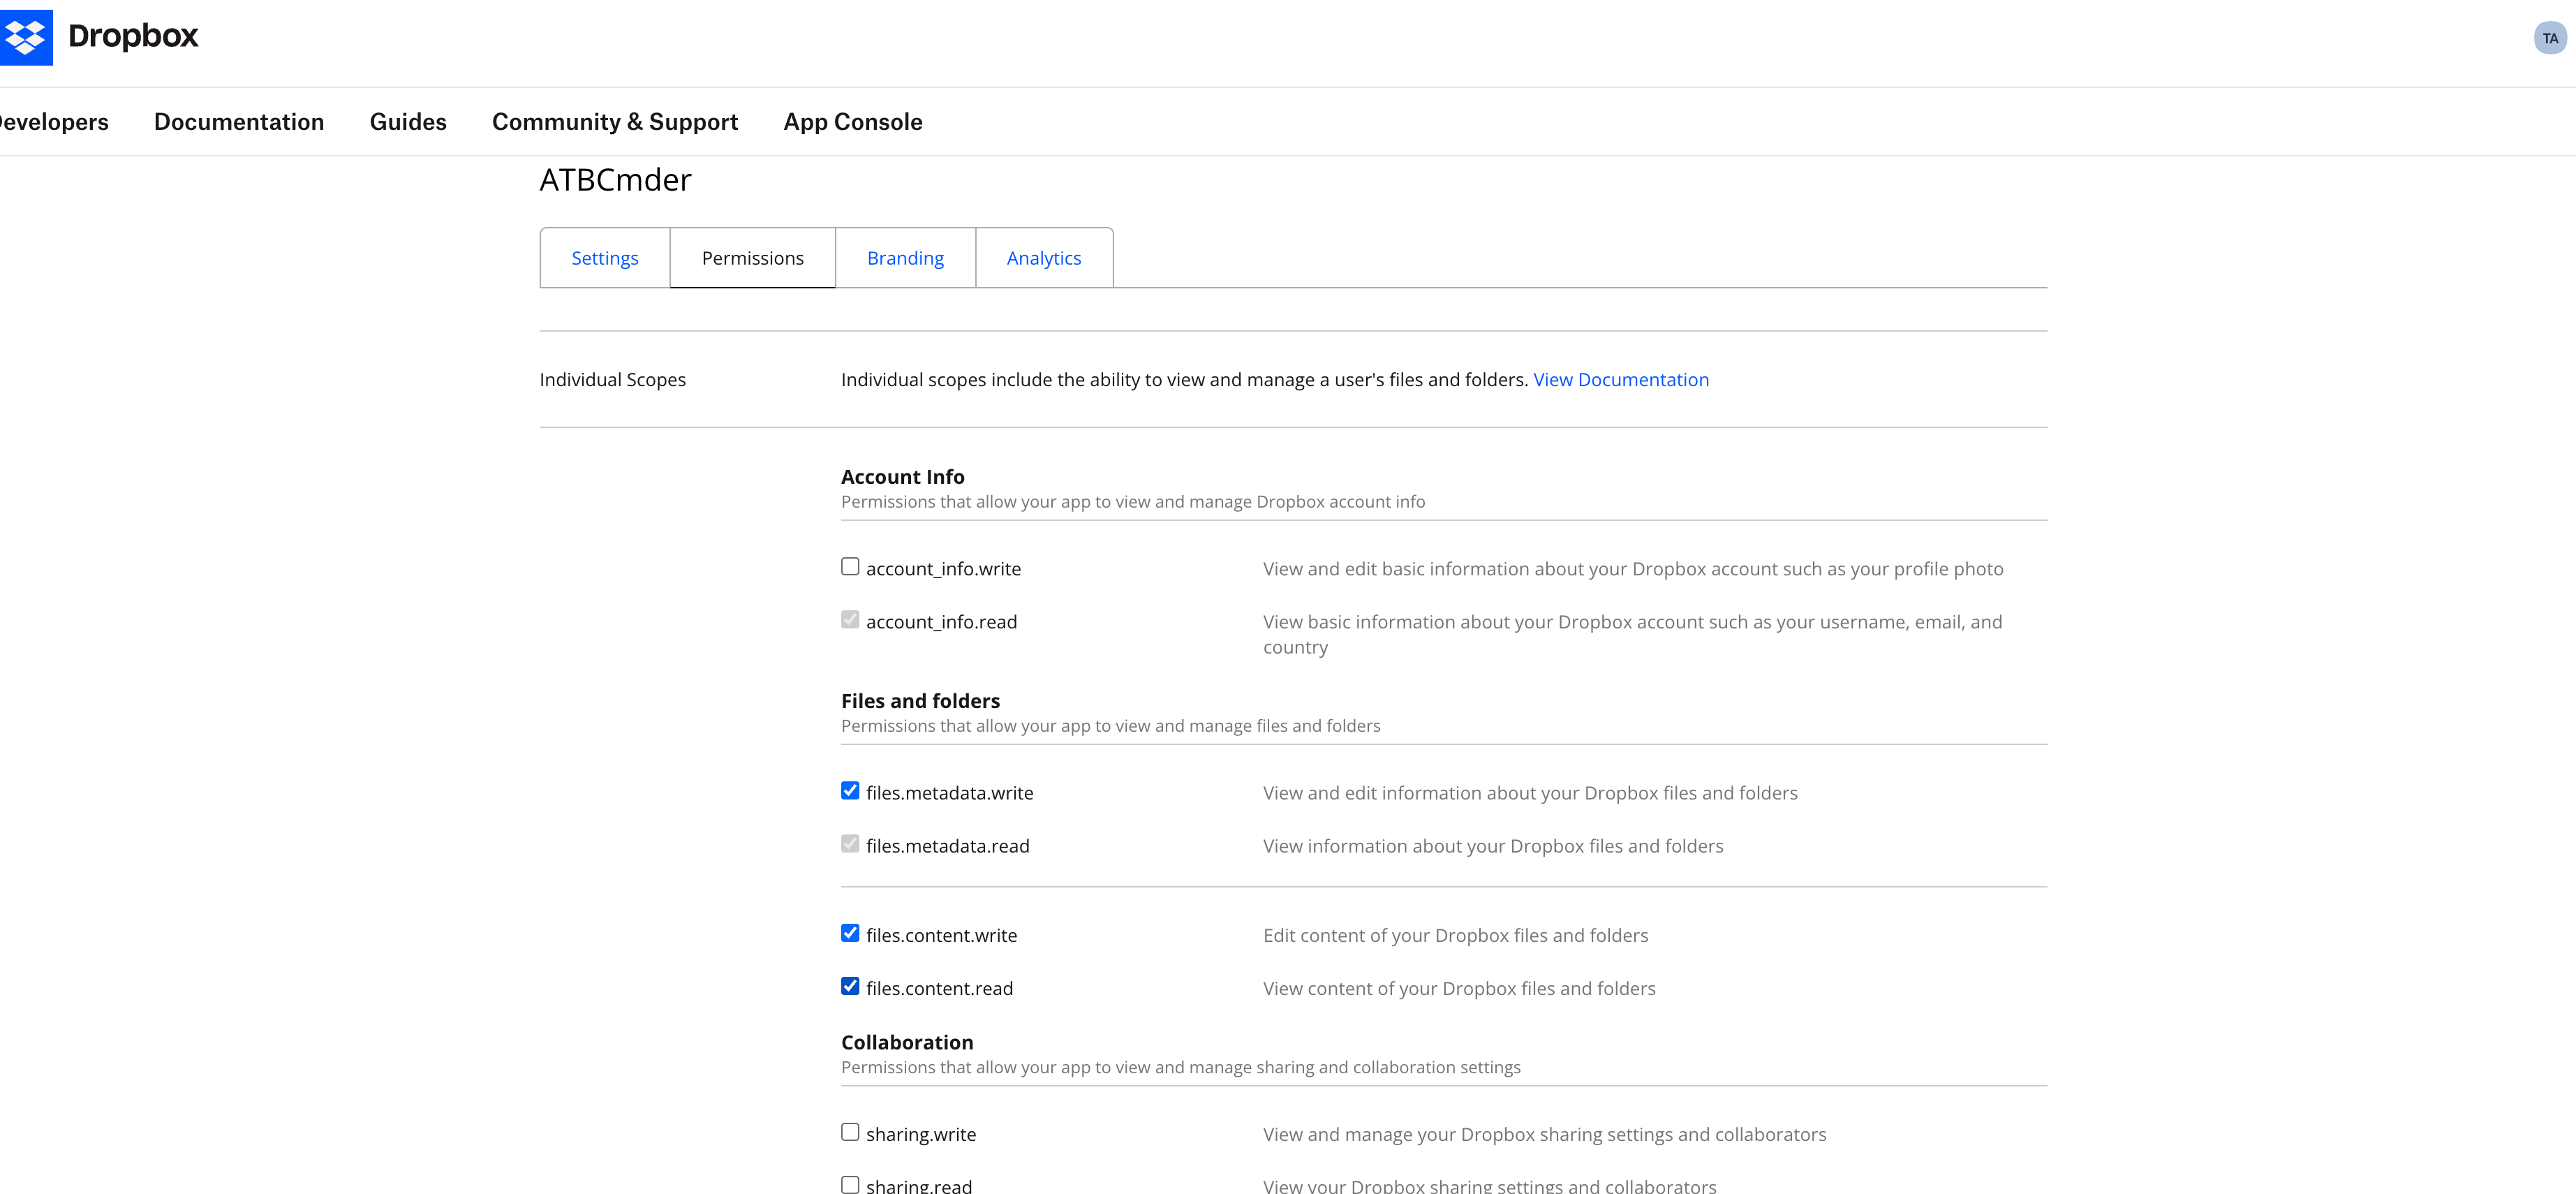
Figure 6.8: Selecting the required permissions under the Permissions tab, including files.metadata.read/write and files.content.read/write.
- Under Account Info:
account_info.read: View basic information about your Dropbox account (checked by default, allows ATBCmder to automatically detect and display your account email upon connecting).- Under Files and folders, ensure the following checkboxes are enabled:
files.metadata.write: View and edit information about your Dropbox files and folders.files.content.write: Edit content of your Dropbox files and folders (uploading and modifying files).files.content.read: View content of your Dropbox files and folders (downloading and viewing files).
Note
Why is files.metadata.read Greyed Out (不可勾选)?
In the screenshot above, you will notice that files.metadata.read (View information about your Dropbox files and folders) has a light grey checkmark inside its box and cannot be manually clicked or toggled.
This is completely normal and expected!
In Dropbox's permission hierarchy, write permissions (files.metadata.write and files.content.write) strictly require read access. Whenever you check files.metadata.write or files.content.read/write, Dropbox automatically enables files.metadata.read for you and locks it in the checked state so it cannot be accidentally unchecked. The permission is already active!
Important
CRITICAL: You MUST Click "Submit" at the Bottom of the Page!
Dropbox does not automatically save changes when you tick checkboxes on the Permissions tab!
You MUST scroll all the way down to the very bottom of the Permissions page and click the blue "Submit" button.
If you close the tab or switch back to the Settings tab without clicking Submit, your permission changes will be discarded!
Step 4: Add Dropbox in ATBCmder & One-Click Authorization
Now that your Dropbox App is properly configured, adding it to ATBCmder takes just a few clicks:
- In ATBCmder, open Network ➔ Manage Connections... from the top menu bar (or press
cm_ManageConnections). - Click the
+ Newbutton in the lower-left corner to create a new profile. - In the Connection Details form on the right:
- Label: Enter a friendly name (e.g.,
My DropboxorTeam Dropbox). - Protocol: Select
dropboxfrom the dropdown menu. - App Key: Paste the App Key you copied from the Dropbox Settings tab.
- App Secret: Paste the App Secret you copied from the Dropbox Settings tab.
- (Optional tip: You can also click the helper link
Create app in Dropbox App Consoledirectly below the secret field to jump to the developer console at any time). - Click the Log in with Browser... (or Authorize) button.
- ATBCmder will automatically open your default web browser to the official Dropbox consent page.
- Review the requested permissions and click Allow (允许).
- Once approved, your browser will confirm the success. Return to ATBCmder, and the status indicator will update to:
✓ Authorized (your_account@email.com)! - Click 💾 Save to bookmark the connection, then click 🔗 Connect (or double-click the connection in the left-hand list).
- A new tab immediately opens in your active panel pointing to: All your Dropbox files and folders are now right in front of you!
Common Issue & Troubleshooting
Warning
Troubleshooting: "Your app is not permitted to access this endpoint because it does not have the required scope 'files.metadata.read'"
If you connect successfully but encounter this error when loading a folder or copying files, here is why it happens and how to fix it in 30 seconds:
- Why does it happen?
- Did you click Submit? If you checked the permissions on Dropbox's Permissions tab but forgot to scroll to the bottom and click the blue Submit button, Dropbox never saved the changes.
- Token Snapshot Behavior: In Dropbox OAuth 2.0, an authorization token captures only the permissions that existed at the moment authorization was granted. If you authorized ATBCmder before enabling the permissions or before clicking Submit, your existing token in the macOS Keychain does not have the new scopes.
- How to fix:
- Go to Dropbox App Console ➔ Permissions tab, ensure the checkboxes are checked, scroll to the bottom, and click Submit.
- Return to ATBCmder ➔ Network ➔ Manage Connections..., select your Dropbox connection, and click the Re-authorize... button.
- Click Allow in your browser to issue a fresh token with all updated permissions.
- Click Connect again, and you're all set!
Step 5: Working with Dropbox Like a Local Drive
Once connected, Dropbox behaves just like a local high-speed drive:
- Dual-Panel Copy (
F5): Select files or directories in your local panel (e.g., your Mac'sDocumentsorDownloads) and pressF5to upload them straight to Dropbox. Or select remote files and pressF5to download them. - Chunked Streaming Transfers: Transfers use non-blocking chunked streaming sessions with real-time progress indicators, gracefully handling multi-gigabyte video or archive files without exhausting system memory.
- Instant Preview (
F3): Select any image, PDF, Markdown, or text file on Dropbox and pressF3to inspect it in the Universal Lister without saving it to disk first. - Folder Creation (
F7): PressF7to create new remote directories. Recursive directory creation automatically creates any missing parent folders. - Drag & Drop: Drag files and folders between the local panel and the Dropbox panel with your mouse.
- Live Cloud Storage Meter: Your remaining Dropbox space is displayed in real time in the top-right toolbar (e.g.,
1.8 GB free of 2.0 GB), keeping you informed of your remaining capacity at a glance. - Instant Refresh (
F9/Ctrl+R): Fetch remote changes made on other devices or sync storage quota with a single keystroke. - Hardware-Backed Security: OAuth refresh tokens and credentials are encrypted directly in the macOS System Keychain (
ATBCmder_VFS) backed by Apple's Secure Enclave.
6.3 App Store Sandbox Cloud Storage (OneDrive, Google Drive, iCloud)
In Mac App Store sandboxed builds of ATBCmder, direct filesystem access to third-party cloud synchronization directories (e.g., Microsoft OneDrive, Google Drive for Desktop, Dropbox, and iCloud Drive) is regulated by Apple's sandbox architecture:
- Security-Scoped Bookmarks: Synced cloud directories residing in
~/Library/CloudStorage/OneDrive-*,~/Library/CloudStorage/GoogleDrive-*, or~/Library/Mobile Documents/com~apple~CloudDocs/require security-scoped access tokens. - Drive Switcher & Path Integration: ATBCmder automatically discovers configured local cloud directories and surfaces them in the Drive Switcher (
Alt+D/⌥D), drive button bars, and path breadcrumbs. - Persistent Permission Grants: When opening a cloud directory for the first time, macOS presents an authorization sheet. Once selected, ATBCmder stores the cryptographic security-scoped bookmark in user preferences, granting seamless, uninterrupted read/write access across application restarts without repeated authorization dialogs.
7. Quick Connect vs. Connection Manager
ATBCmder provides two flexible mechanisms for connecting to remote hosts: Quick Connect for fast, temporary sessions, and Connection Manager for persistent, categorized server bookmarks.
7.1 Quick Connect (cm_NetworkConnect)
When you need to quickly access a server without cluttering your permanent configuration:
- Choose Network ➔ Quick Connect... (or execute command
cm_NetworkConnect). - The lightweight connection prompt appears:
- Protocol: Select
sftp,ftp,ftps,smb,webdav,webdavs,gdrive, ordropbox. - Host & Port: Enter the server address (port auto-populates default values).
- Username & Password: Input connection credentials.
- Remote Path: Starting remote directory (default:
/). - Remember password: Leave unchecked for a single-session ephemeral connection.
- Click Test Connection to verify network handshake and credentials before connecting.
- Click Connect. ATBCmder immediately opens a new tab in the active panel pointing to the remote server.
7.2 Connection Manager (cm_ManageConnections)
For servers you access regularly, the Connection Manager provides a complete configuration dashboard:
┌────────────────────────────────────────────────────────────────────────────────────────┐
│                              CONNECTION MANAGER DIALOG                                 │
├──────────────────────────────┬─────────────────────────────────────────────────────────┤
│  Saved Connections           │  Connection Details                                     │
│  ┌────────────────────────┐  │  Label:        [ Staging Web Server (AWS)             ] │
│  │ 🔐 AWS Staging Server  │  │  Protocol:     [ SFTP (port 22)                     ▼ ] │
│  │ 🖧 Synology Office NAS │  │  Host:         [ ec2-54-210-10-2.compute.amazonaws.com] │
│  │ 🌐 Nextcloud Personal  │  │  Port:         [ 22                                   ] │
│  │ 📂 Legacy Archive FTP  │  │  Username:     [ ubuntu                               ] │
│  │                        │  │  Password:     [ ••••••••••••••••••                   ] │
│  │                        │  │  Remote Path:  [ /var/www/production                  ] │
│  │                        │  │  [✓] Remember password in macOS Keychain                │
│  └────────────────────────┘  │                                                         │
│  [➕ New] [⧉ Dup] [🗑 Del]    │  [🔍 Test Connection]          [💾 Save]  [🔗 Connect] │
└──────────────────────────────┴─────────────────────────────────────────────────────────┘
Managing Server Profiles
- Create New (
➕ New): Clears the right-hand form to define a new server configuration. - Duplicate (
⧉ Duplicate): Clones the selected connection profile. Ideal when managing multiple environments (development, staging, production) on identical host configurations. - Delete (
🗑 Delete): Removes the connection profile and deletes associated credentials from the system keychain. - Test Connection (
🔍 Test Connection): Dispatches a background worker (ConnectionTestWorker) to connect, authenticate, and gracefully disconnect, verifying server responsiveness without navigating away. - Connect (
🔗 Connect): Saves any pending field edits, establishes the remote session, and loads the remote directory into a new active panel tab.
Dynamic Saved Connections Menu
Saved connections are automatically integrated into the top menu bar under Network ➔ Saved Connections. You can mount any bookmarked server with a single click:
Network ➔ Saved Connections ➔ 🔐 AWS Staging ServerNetwork ➔ Saved Connections ➔ 🖧 Synology Office NAS
8. Credential Safety & Keychain Integration
File manager configuration files are a prime target for credential harvesting malware. Many legacy file managers store FTP/SFTP passwords in plaintext XML or INI configuration files located in the user's home directory.
ATBCmder guarantees zero cleartext credential storage.
8.1 The Security Architecture
┌────────────────────────────────────────────────────────────────────────────────────────┐
│                           CREDENTIAL STORAGE ARCHITECTURE                              │
├────────────────────────────────────────────────────────────────────────────────────────┤
│                                                                                        │
│   Connection Configuration XML                    Apple System Keychain                │
│   (~/.config/atbcmder/atbcmder.xml)               (service: "ATBCmder_VFS")            │
│   ┌─────────────────────────────────────┐         ┌──────────────────────────────────┐ │
│   │ <connection>                        │         │ Label: "AWS Staging Server"      │ │
│   │   <label>AWS Staging</label>        │         │ Key:   Encrypted Secret          │ │
│   │   <scheme>sftp</scheme>             │         │ Access: Controlled by macOS      │ │
│   │   <host>aws.infra.net</host>        │         │         Hardware Security Enclave│ │
│   │   <user>deploy</user>               │         └──────────────────────────────────┘ │
│   │   <password></password>             │                           ▲                  │
│   │ </connection>                       │                           │                  │
│   └─────────────────────────────────────┘                           │                  │
│         ▲                                                           │                  │
│         │ Password stripped on save                                 │ Stored via       │
│         └─────────────────── ConnectionManager ─────────────────────┘ Python keyring   │
│                                                                                        │
└────────────────────────────────────────────────────────────────────────────────────────┘
- Cleartext XML Scrubbing: Whenever connection profiles are serialized to disk (
atbcmder.xml), theConnectionManager.save()routine explicitly forcesd["password"] = ""before writing. Even if an unauthorized party inspects your configuration XML, no server passwords will ever be revealed. - macOS System Keychain Encryption: When the Remember password checkbox is selected, passwords are saved directly into the macOS Keychain via the system
keyringAPI under the secure service identifierATBCmder_VFS. Key derivation and storage are safeguarded by Apple's hardware Secure Enclave. - Ephemeral In-Memory Sessions: If "Remember password" is unchecked, credentials are held strictly in dynamic memory (
VFSSessionCache) during the current application lifecycle and are erased the moment ATBCmder terminates.
9. ⚡ Pro Tips: High-Performance Remote Operations
Tip 1: Non-Blocking Background Transfer Queue (cm_OperationsPanel)
When copying large directories across remote servers or downloading multi-gigabyte ISOs over SFTP, never freeze your workspace. All network file operations in ATBCmder automatically integrate with the Background Operations Queue:
- Press
F5to initiate a transfer, then click Background (or let it queue automatically). - Open the operations panel via Show ➔ Operations Panel (
cm_OperationsPanel) to monitor live bandwidth charts, per-file byte counts, and remaining transfer estimates. - You can pause, resume, or reorder queued network transfers while continuing to browse local files in both panels.
Tip 2: Stream Copying Across Heterogeneous Protocols
ATBCmder's stream_copy_file engine enables direct server-to-server streaming. If you drag a folder from an SFTP server in the Left Panel to an SMB network share in the Right Panel:
- ATBCmder does not download the entire directory to your local Mac hard drive before re-uploading.
- Data is chunked through an in-memory buffer ring, streaming bytes from the source socket directly into the target socket. This eliminates local disk wear and accommodates transfers larger than your available local SSD capacity.
Tip 3: Network Keep-Alive & Preventing Connection Drops
Stateful network firewalls and NAT gateways frequently sever idle TCP connections after 60 to 300 seconds of inactivity. To prevent disconnected sessions when browsing large remote trees:
- ATBCmder's
BaseNetworkVFSlayer automatically maintains session heartbeats across idle connections. - If a momentary network drop occurs, the internal
_retry()mechanism executes up to 3 retry attempts using exponential backoff (2^attemptsecond intervals) before reporting a connection failure.
Tip 4: Editing Remote Files with Auto-Upload Lifecycle
Need to edit an nginx.conf or a Python script directly on a remote server?
- Highlight the remote file in your SFTP or WebDAV panel view.
- Press
F4(Fn+F4). - ATBCmder downloads the file to an isolated temporary sandbox (
/tmp/) and opens it in the built-in Editor. - Each time you press
Cmd+S(⌘S), ATBCmder triggers_upload_vfs_temp(), streaming the updated file back to the remote server asynchronously and flashing a confirmation in the status bar. - When you close the editor, the temporary file is securely unlinked from
/tmp/.
10. System & Security Alerts
Warning
SSH Host Key & Fingerprint Verification
To protect against man-in-the-middle (MITM) attacks and credential eavesdropping, ATBCmder's SFTP engine strictly validates server fingerprints against your local ~/.ssh/known_hosts registry before initiating cryptographic key exchange or transmitting passwords. If a server's fingerprint differs from the stored record, the connection is immediately aborted with a security warning dialog detailing the mismatch. Never bypass host key warnings on untrusted public Wi-Fi networks without independently confirming host key changes with your server administrator.
Important
Temporary Cache Space for Large Remote Files
When viewing (F3) or editing (F4) multi-gigabyte files stored on remote VFS servers, ATBCmder streams the target item to your local /tmp volume. Ensure your Mac's primary APFS container has sufficient free storage space before opening massive remote video or database files.
Caution
Unmounting Remote Network Shares
For SMB shares mounted via macOS mount_smbfs, terminating network connectivity without disconnecting can leave stale mount handles in /Volumes/. Always use the panel drive menu or disconnect action before closing your laptop or changing Wi-Fi networks.
11. Master Dual-Matrix Keyboard Reference Table
| Category | Action Description | macOS Shortcut | Classic Commander Key | Command ID |
|---|---|---|---|---|
| Archive Operations | Pack Selected Files / Folders | Alt+F5 / ⌥F5 |
Alt+F5 |
cm_PackFiles |
| Archive Operations | Extract Selected Archive(s) | Alt+F9 / ⌥F9 |
Alt+F9 |
cm_ExtractFiles |
| Archive Operations | Browse Inside Archive Container | Enter / ⏎ |
Enter |
cm_Open |
| Archive Operations | Exit Archive to Parent Directory | Backspace / ⌫ |
Backspace |
cm_ChangeDirToParent |
| Archive Operations | Preview File inside Archive | F3 / Fn+F3 |
F3 |
cm_View |
| Archive Operations | Edit File inside Archive (Live) | F4 / Fn+F4 |
F4 |
cm_Edit |
| Archive Operations | Extract Selected Items Only | F5 / Fn+F5 |
F5 |
cm_Copy |
| Archive Operations | Split Large Archive into Volumes | Alt+F6 / ⌥F6 |
Alt+F6 |
cm_FileSpliter / cm_Split |
| Archive Operations | Reassemble Split Volume Pieces | Menu: Files ➔ Combine Files | — | cm_FileLinker / cm_Combine |
| Network Connections | Quick Network Connect Dialog | Menu: Network | — | cm_NetworkConnect |
| Network Connections | Manage Network Connections | Menu: Network | — | cm_ManageConnections |
| Network Connections | Quick Connect to FTP Server | Ctrl+S / ⌃S |
Ctrl+S |
cm_FTPConnect |
| Network Connections | Disconnect Remote Network Share | Menu: Network | — | cm_NetworkDisconnect |
| Transfer Management | Open Operations Transfer Queue | Menu: Show | — | cm_OperationsPanel |
| Transfer Management | Pause / Resume Active Queue | Space (in Queue) |
Space |
— |
Ready to monitor system resources, analyze disk usage, and safely clean caches?